Building and measuring a sign up funnel with Next.js, Supabase, and PostHog
Oct 21, 2021
- Phil Leggetter
On this page
- Before you begin
- Bootstrap sign up with Supabase Auth
- Build a sign up funnel
- Signup flow landing page
- Integrate with PostHog
- Create a sign up funnel in PostHog
- Step 1 - User lands on landing page
- Step 2 - User clicks SignUp button
- Step 3 - User submits sign up form
- Step 4 - User receives registration email
- Step 5 - User clicks on link in email and logs into app
- Conclusion
- Where next?
- Use Actions instead of Events
- Track email sending
Estimated reading time: 20 minutes ☕☕☕
With the number of software frameworks and services available to help with developer productivity and feature building, it's never been a better time to be a software developer. One of most important things you'll have to build, whether building a SaaS, developer tool, or consumer app, is a sign up flow that begins on a landing page and ideally results in a successful sign up. The purpose of this sign up flow is to get as many real users through to being successfully signed up on your app or platform. So, it's important that you can measure whether your sign up flow is converting and where any potential sign ups are dropping out of that funnel.
In this tutorial, we'll create a simple sign up flow in a Next.js app, starting with a Supabase example for authentication. We'll then look at how you can instrument that sign up flow using the PostHog JavaScript SDK and create a sign up funnel visualization within PostHog to analyze the success - or failure - of the sign up flow.
Before you begin
The application in this tutorial is built entirely upon open-source technologies:
- Next.js is feature rich, Node.js open-source React framework for building modern web apps.
- Supabase is an open-source alternative to Firebase offering functionality such as a Postgres database, authentication, realtime subscriptions and storage.
- PostHog is an open-source product analytics platform with features including feature flags, session replay, analysis of trends, funnels, user paths, and more.
To follow this tutorial along, you need to have:
- A self-hosted instance of PostHog or sign up for PostHog Cloud
- A self-hosted instance of Supabase or sign up for a hosted Supabase account
- Node.js installed
It's easier to get up an running with the cloud hosted options. If you want to go with self-hosted then the DigitalOcean PostHog 1-click deployment makes getting started with PostHog much easier. For Supabase, the Docker setup appears to be the best option.
Bootstrap sign up with Supabase Auth
Rather than building sign up from scratch, let's instead start with an existing Supabase-powered example.
Run the following in your terminal to bootstrap a Next.js application with pre-built sign up and login functionality:
The output will look similar to the following:
You'll be prompted for a name for your app and the files will be downloaded into a directory with that name. The directory structure of your app will look as follows:
components/Auth.jsis the sign up, login, magic link, and forgot password component that makes use of Supabase Auth.lib/UserContext.jsprovides functionality to get the current user from within a component wrapped in a<UserContext />, if a user is logged in.pages/_app.jsa Next.js custom app component used to initialize all pages.pages/api/*serverless API endpoints used within the Supabase authentication.pages/auth.jsis the authentication page that uses theAuthcomponent.pages/profile.jsis a page used to demonstrate server-side rendering..env.local.exampleenvironment variables/configuration.styles.cssbasic styling.utils/initSupabase.jsinitializes a Supabase client used to interact with Supabase.
Now we understand the basic structure of the bootstrapped application, let's get it up and running.
The one last piece of setup that's required before running the app is to create a Supabase project, set some auth config, and add the credentials from that to a .env.local. To create the .env.local run:
Now, head to the Supabase dashboard to create a project. Click the New project button and you'll be presented with a "Create new project" dialog.
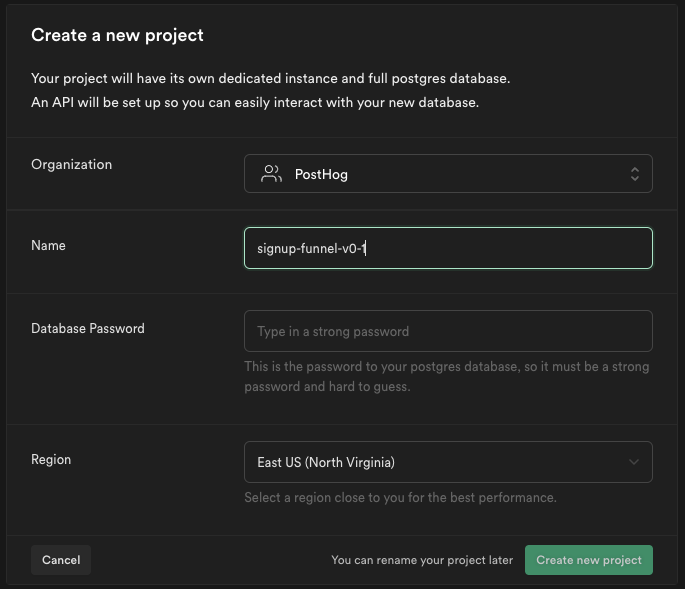
You may need to select an Organization. You will need to enter details for a project name, database password, and choose a deployment region. Once done, click the Create new project button.
You'll then be presented with a page showing Project API keys and Project Configuration.
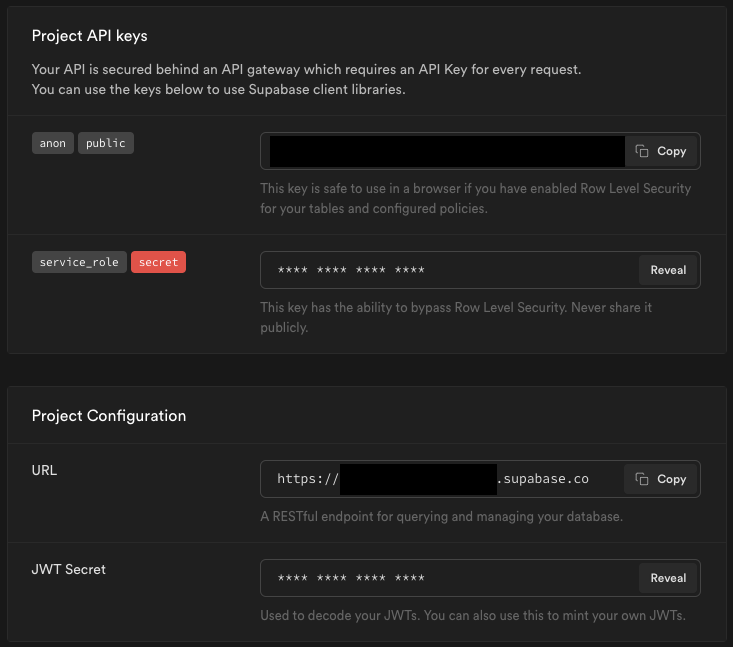
Update the contents of .env.local as follows:
- Update the
NEXT_PUBLIC_SUPABASE_URLvalue to be the URL from Project Configuration - Update the
NEXT_PUBLIC_SUPABASE_ANON_KEYvalue to be the API key tagged withanonandpublicfrom Project API keys
Next, within the Supabase dashboard project settings select Auth settings and add http://localhost:3000/auth to the Additional Redirect URLs field.
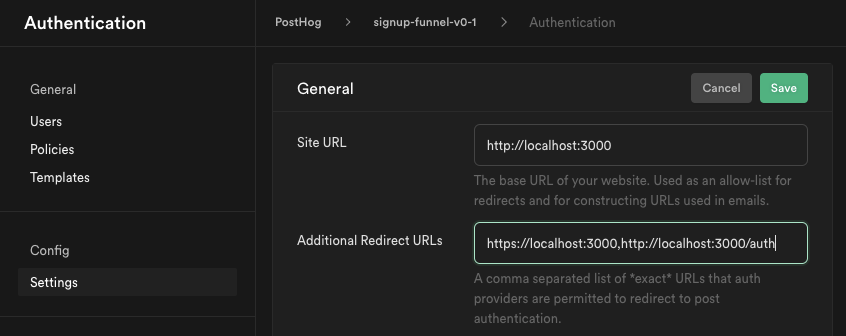
With the Supabase configuration in place, we can run the app with:
You can then navigate to http://localhost:3000/auth to try out the Supabase authentication functionality including sign up, login, login/sign up with magic link (email), and forgot password.
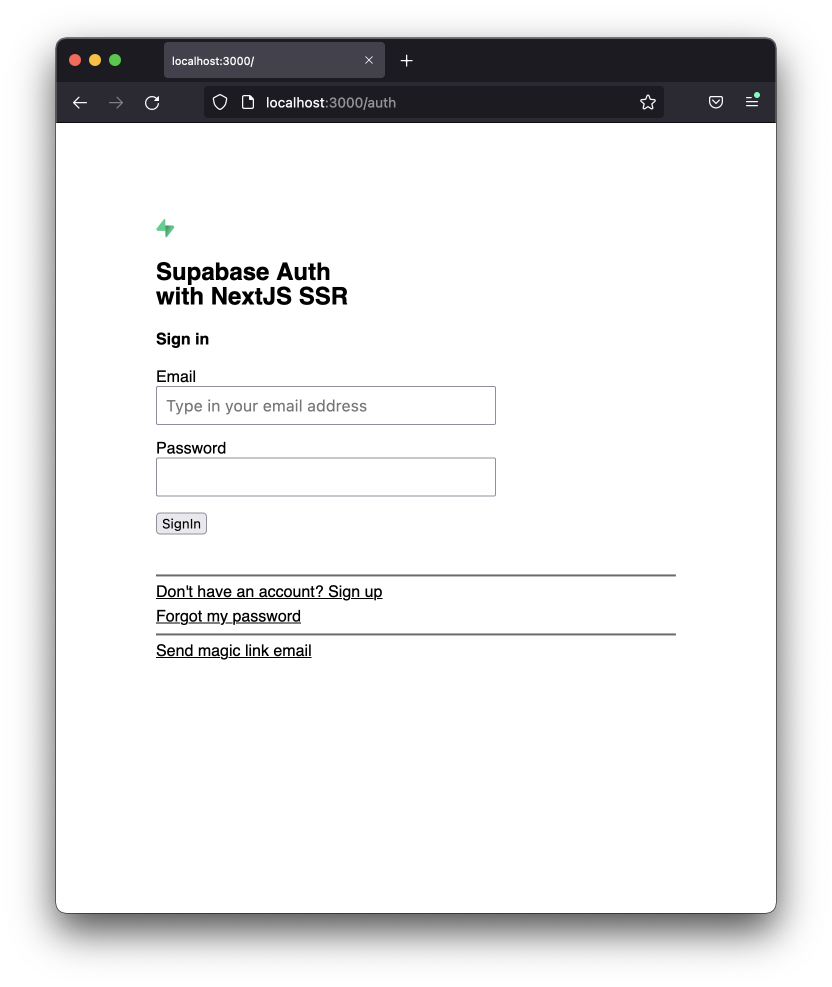
When you're signed up and logged in the UI will look like this:
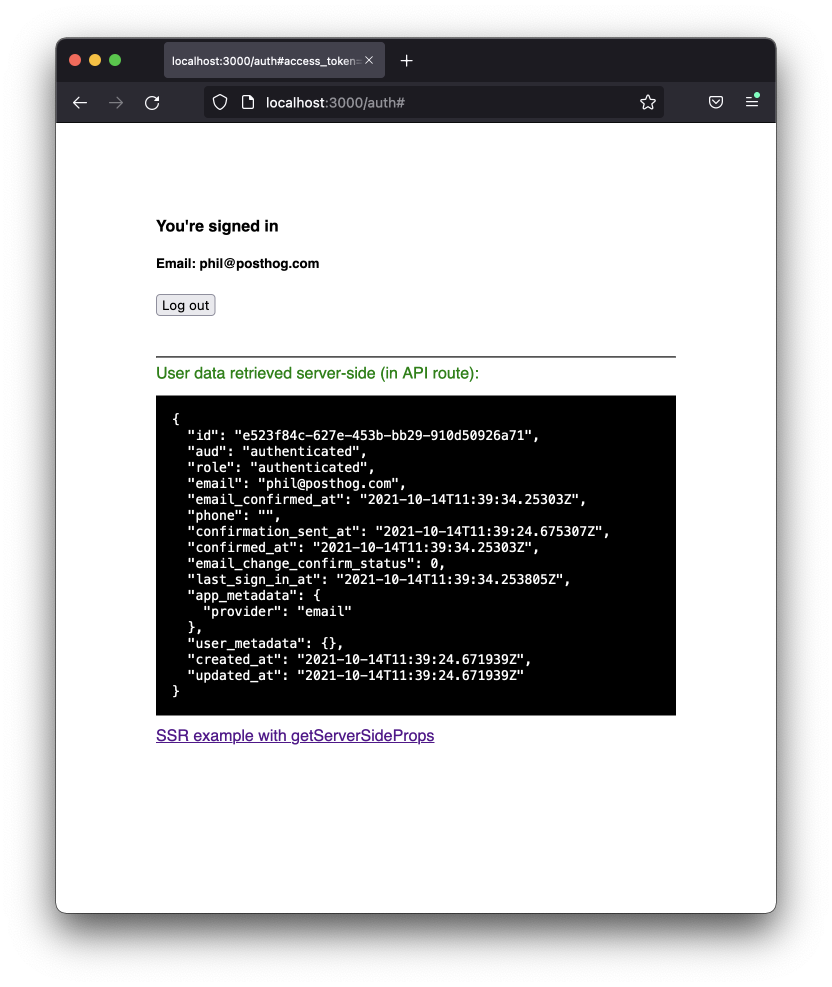
We'll focus on sign up for our application, so try out the sign up with email and password functionality as well as the magic link sign up (note magic link emails for a single email address can be sent once per 60 seconds).
Once you're familiar with Supabase Auth functionality, we're ready to start to build a simple traditional sign up funnel.
Build a sign up funnel
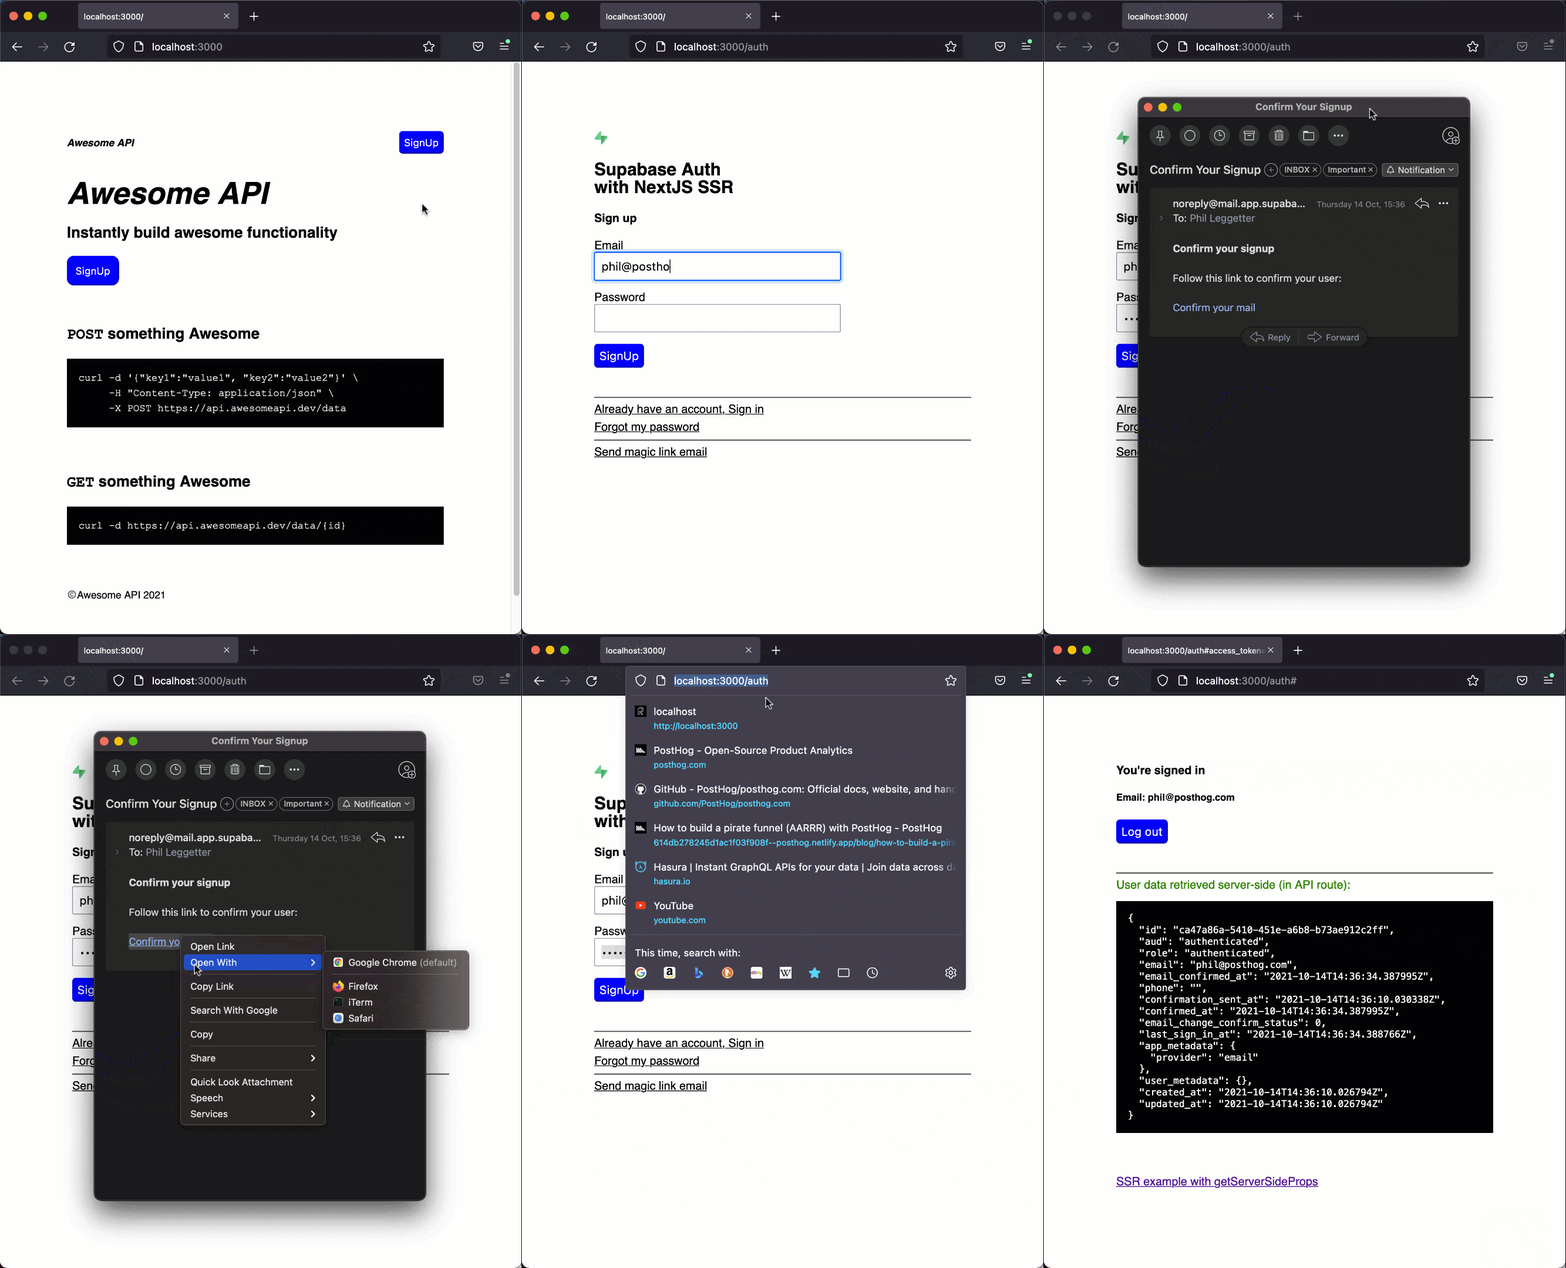
The goal of this tutorial is to demonstrate how to instrument and measure a sign up flow. So, let's create a very simple sign up flow as follows:
- User lands on the main website landing page which has two CTAs (call-to-actions) of SignUp. One in the header and one in the landing page hero.
- User clicks on one of the sign up buttons and is taken to the sign up page.
- User enters their details to sign up and submits the form.
- User receives registration verification email.
- User clicks the link in the email and successfully signs up.
Signup flow landing page
We'll keep the landing page really simple. Create a new file, pages/index.js, with the following content:
As planned, the page has two CTA <button> elements that send the user to the /auth page for sign up. One button is in the header and one is in what you could class as a "hero" location.
This will result in an "Awesome API" landing page that looks as follows:
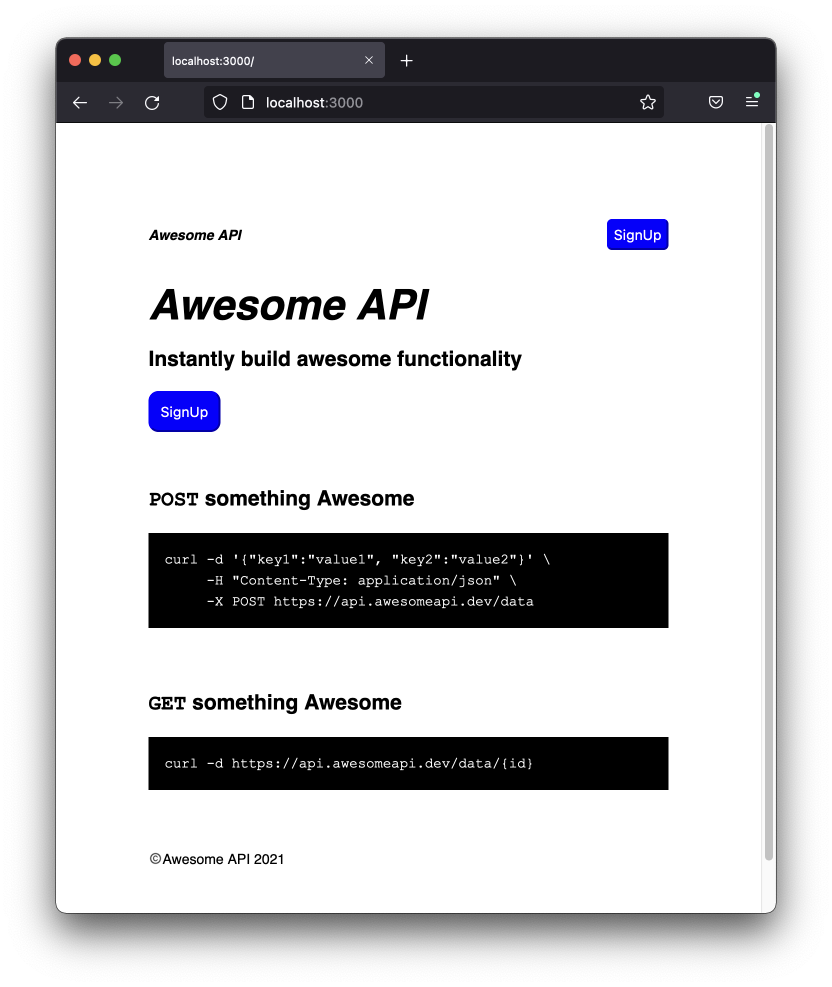
Feel free to rebrand!
Now that a landing page is in place we have all the assets required for a basic sign up flow that we want the user to successfully navigate through.
Integrate with PostHog
A user can now sign up with our app but there are a number of potential drop-off points within the funnel. So, let's integrate the PostHog JavaScript SDK to instrument the user sign up journey.
Add two new environment variables to .env.local that will be used with the PostHog JavaScript SDK:
The value for NEXT_PUBLIC_POSTHOG_API_KEY can be found via Project in the left-hand menu of your PostHog app, underneath the Project API Key heading.
The value for NEXT_PUBLIC_POSTHOG_HOST is the public URL for ingesting events into your PostHog instance. If you're using US cloud, this is https://us.i.posthog.com.
With the required config in place we can install the PostHog JavaScript SDK:
Open up pages/_app.js and add this code within the MyApp function:
Here, we import the React useEffect and Next.js Router hooks. Within the useEffect hook we initialize the PostHog JS client using the function we've just created and bind to a routeChangeComplete on the Next.js router, handling the event within the handleRouteChange function. When this function is called, we manually trigger a $pageview event using PostHog JS with posthog.capture('$pageview').
Now, restart your application so it picks up the new config in .env.local and head over to the Events section within your PostHog instance and you'll see new events appear as you test out the sign up flow.
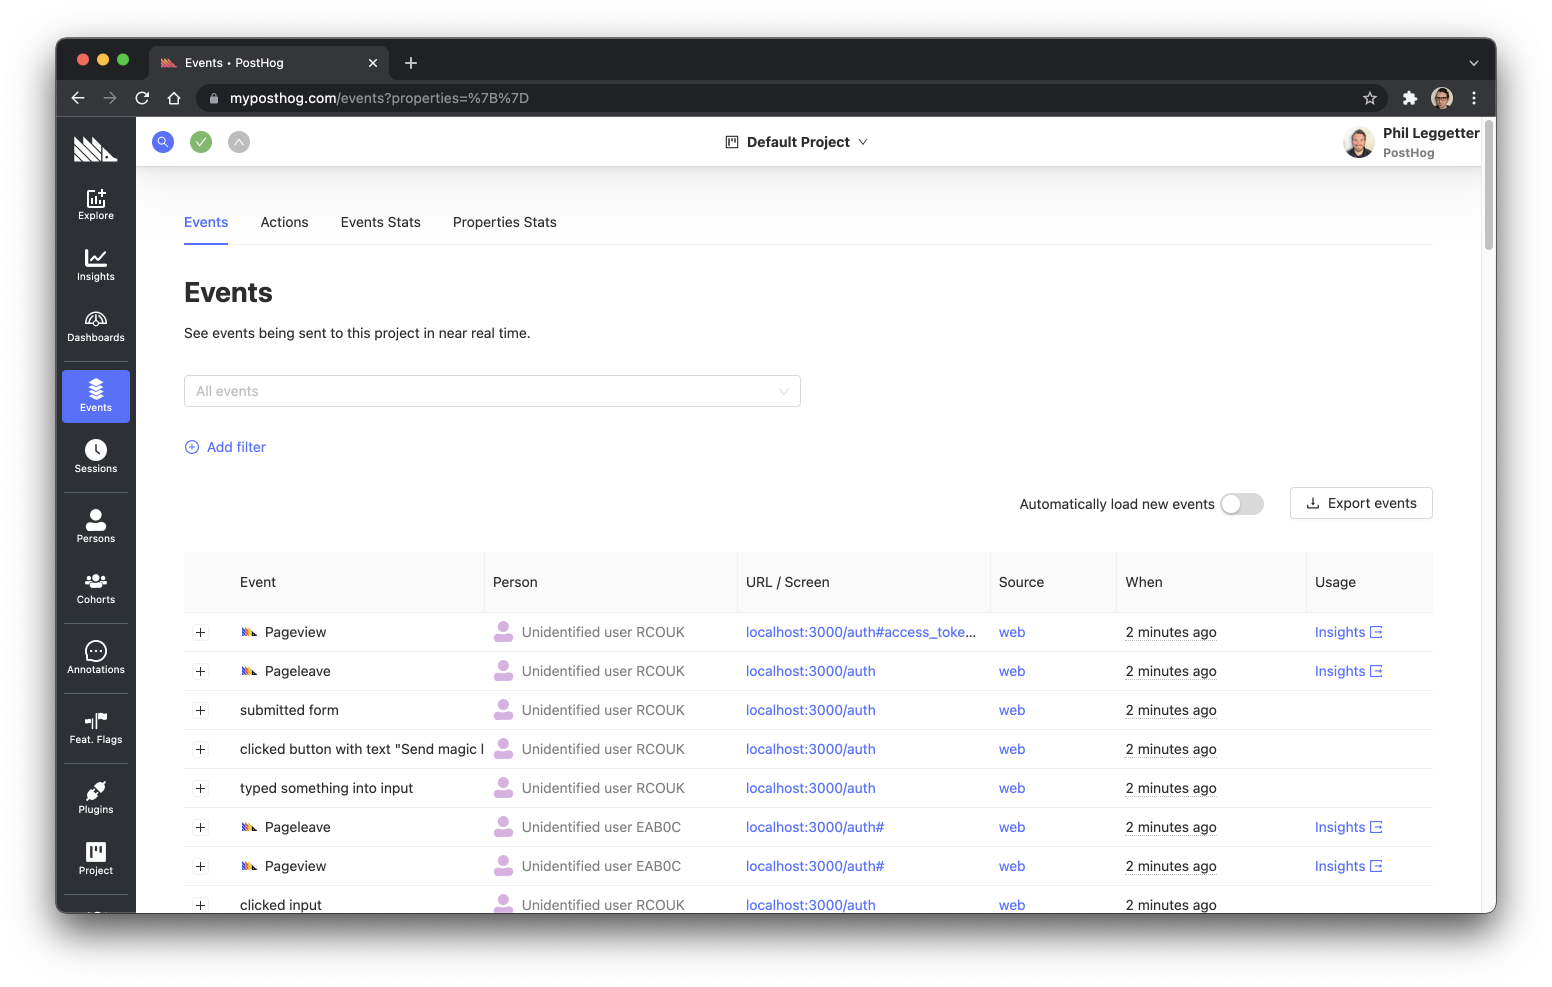
Here's how some of the events can tie in to the flow we're trying to build:
| Step | Event | Url / Screen |
|---|---|---|
| 1. User lands on the main website landing page | Pageview | locahost:3000/ |
| 2. User clicks on one of the sign up buttons | clicked button with text "SignUp" | locahost:3000/ |
| 3. User enters their details to sign up and submits the form | submitted form | localhost:3000/auth |
| 4. User receives registration verification email | no event | outside of app |
| 5. User clicks the link in the email and successfully signs up | no event | localhost:3000/auth |
From the above table, you can see that we can track everything up until the sign up form submission.
It is theoretically possible to track the step 4, email verification, if the email provider exposes an email sent notification mechanism via something like as a webhook. So, if Supabase offered a webhook when auth emails were sent we could track this from the server.
However, we need and should be able to track step 5, when the user has successfully signed up. We know that the user lands on /auth when they are logged in. If we look at the code for that page there is a user variable that is set if the user is logged in. So, let's update /pages/auth.js so we can track a logged in user.
To do this, update the Index definition:
In the above code we utilize the usePostHog function again to reference an initialized PostHog JS instance. We then make two function calls:
posthog.identify(user.email, user)- since the user is logged in we can identify them. We pass inuser.email, their email address, as a distinct identifier. We also pass in the Supabaseuservariable so PostHog has access to additional user data.posthog.capture('loggedIn')- this triggers a simpleloggedInevent that we can use to identify the user as successfully having logged in.
If you now go through the login flow, you can map all the required events in PostHog to the sign up funnel that we're building.
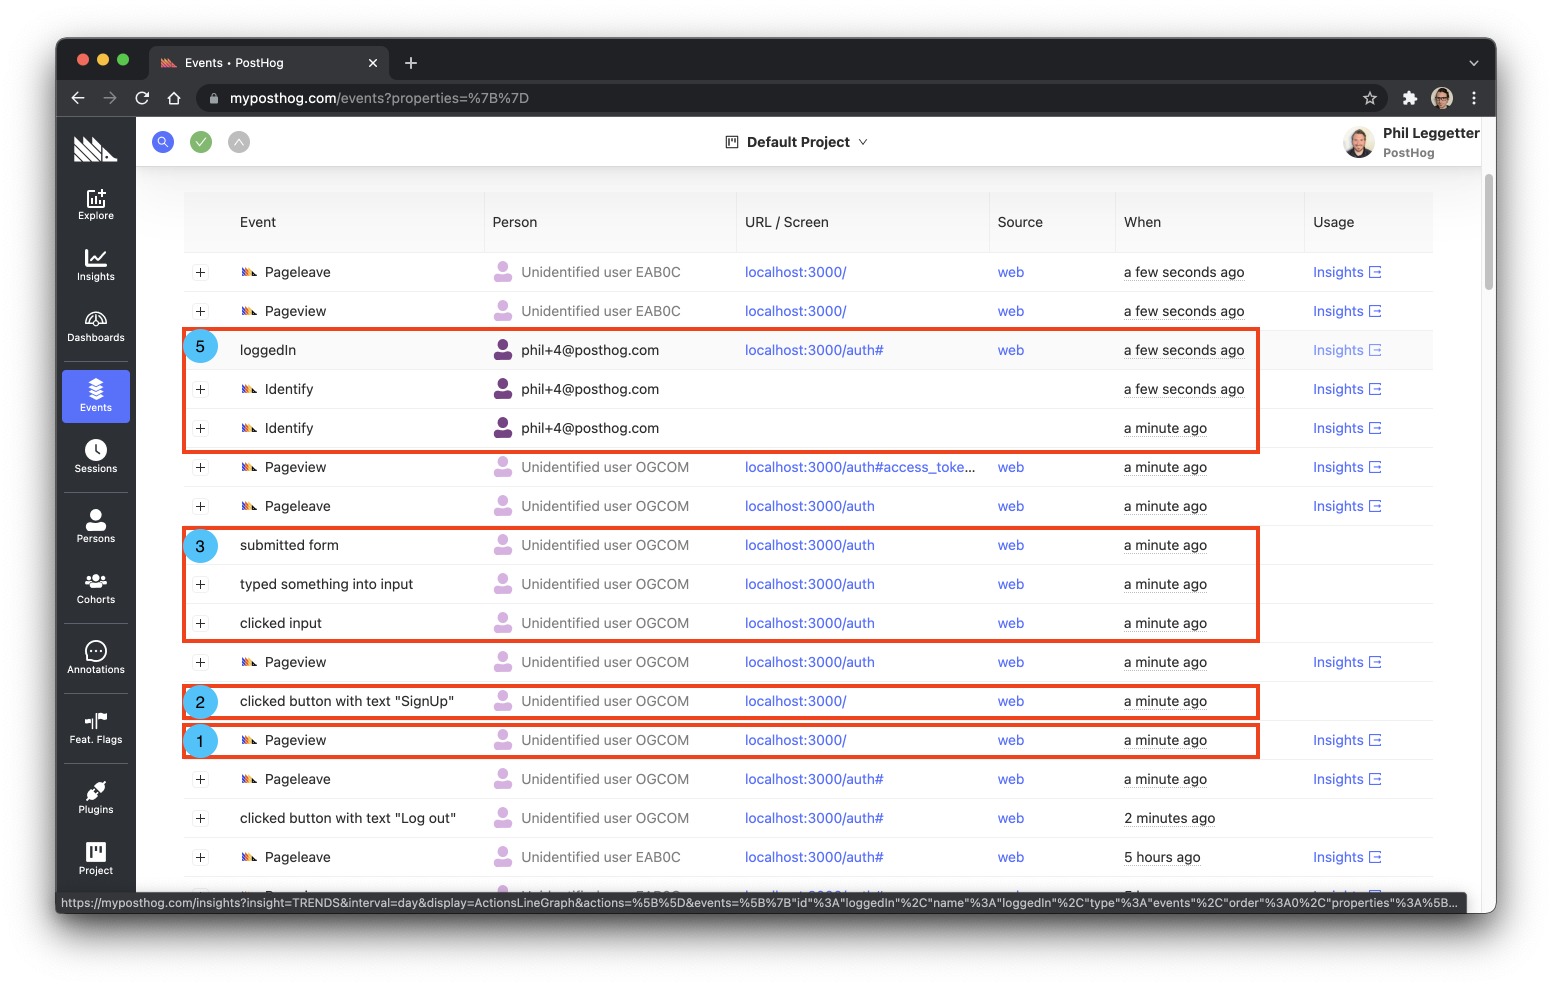
You'll also see the point at which posthog.identify is called since the Person associated with the event is now listed with each event entry.
Note: posthog.identify is being called twice as the Index function is likely being called twice during the React component life cycle as the values of state variables change.
Create a sign up funnel in PostHog
Now that we have all the events for our sign up flow we can define a funnel to analyze the user journey and identify drop-off points.
First, let's recap the events in the funnel and include the new loggedIn event:
| Step | Event | Url / Screen |
|---|---|---|
| 1. User lands on the main website landing page | Pageview | locahost:3000/ |
| 2. User clicks on one of the sign up buttons | clicked button with text "SignUp" | locahost:3000/ |
| 3. User enters their details to sign up and submits the form | submitted form | localhost:3000/auth |
| 4. User receives registration verification email | no event | outside of app |
| 5. User clicks the link in the email and successfully signs up | loggedIn | localhost:3000/auth |
To begin defining a funnel click on the New Insight left-hand menu item within PostHog and select the Funnels tab.
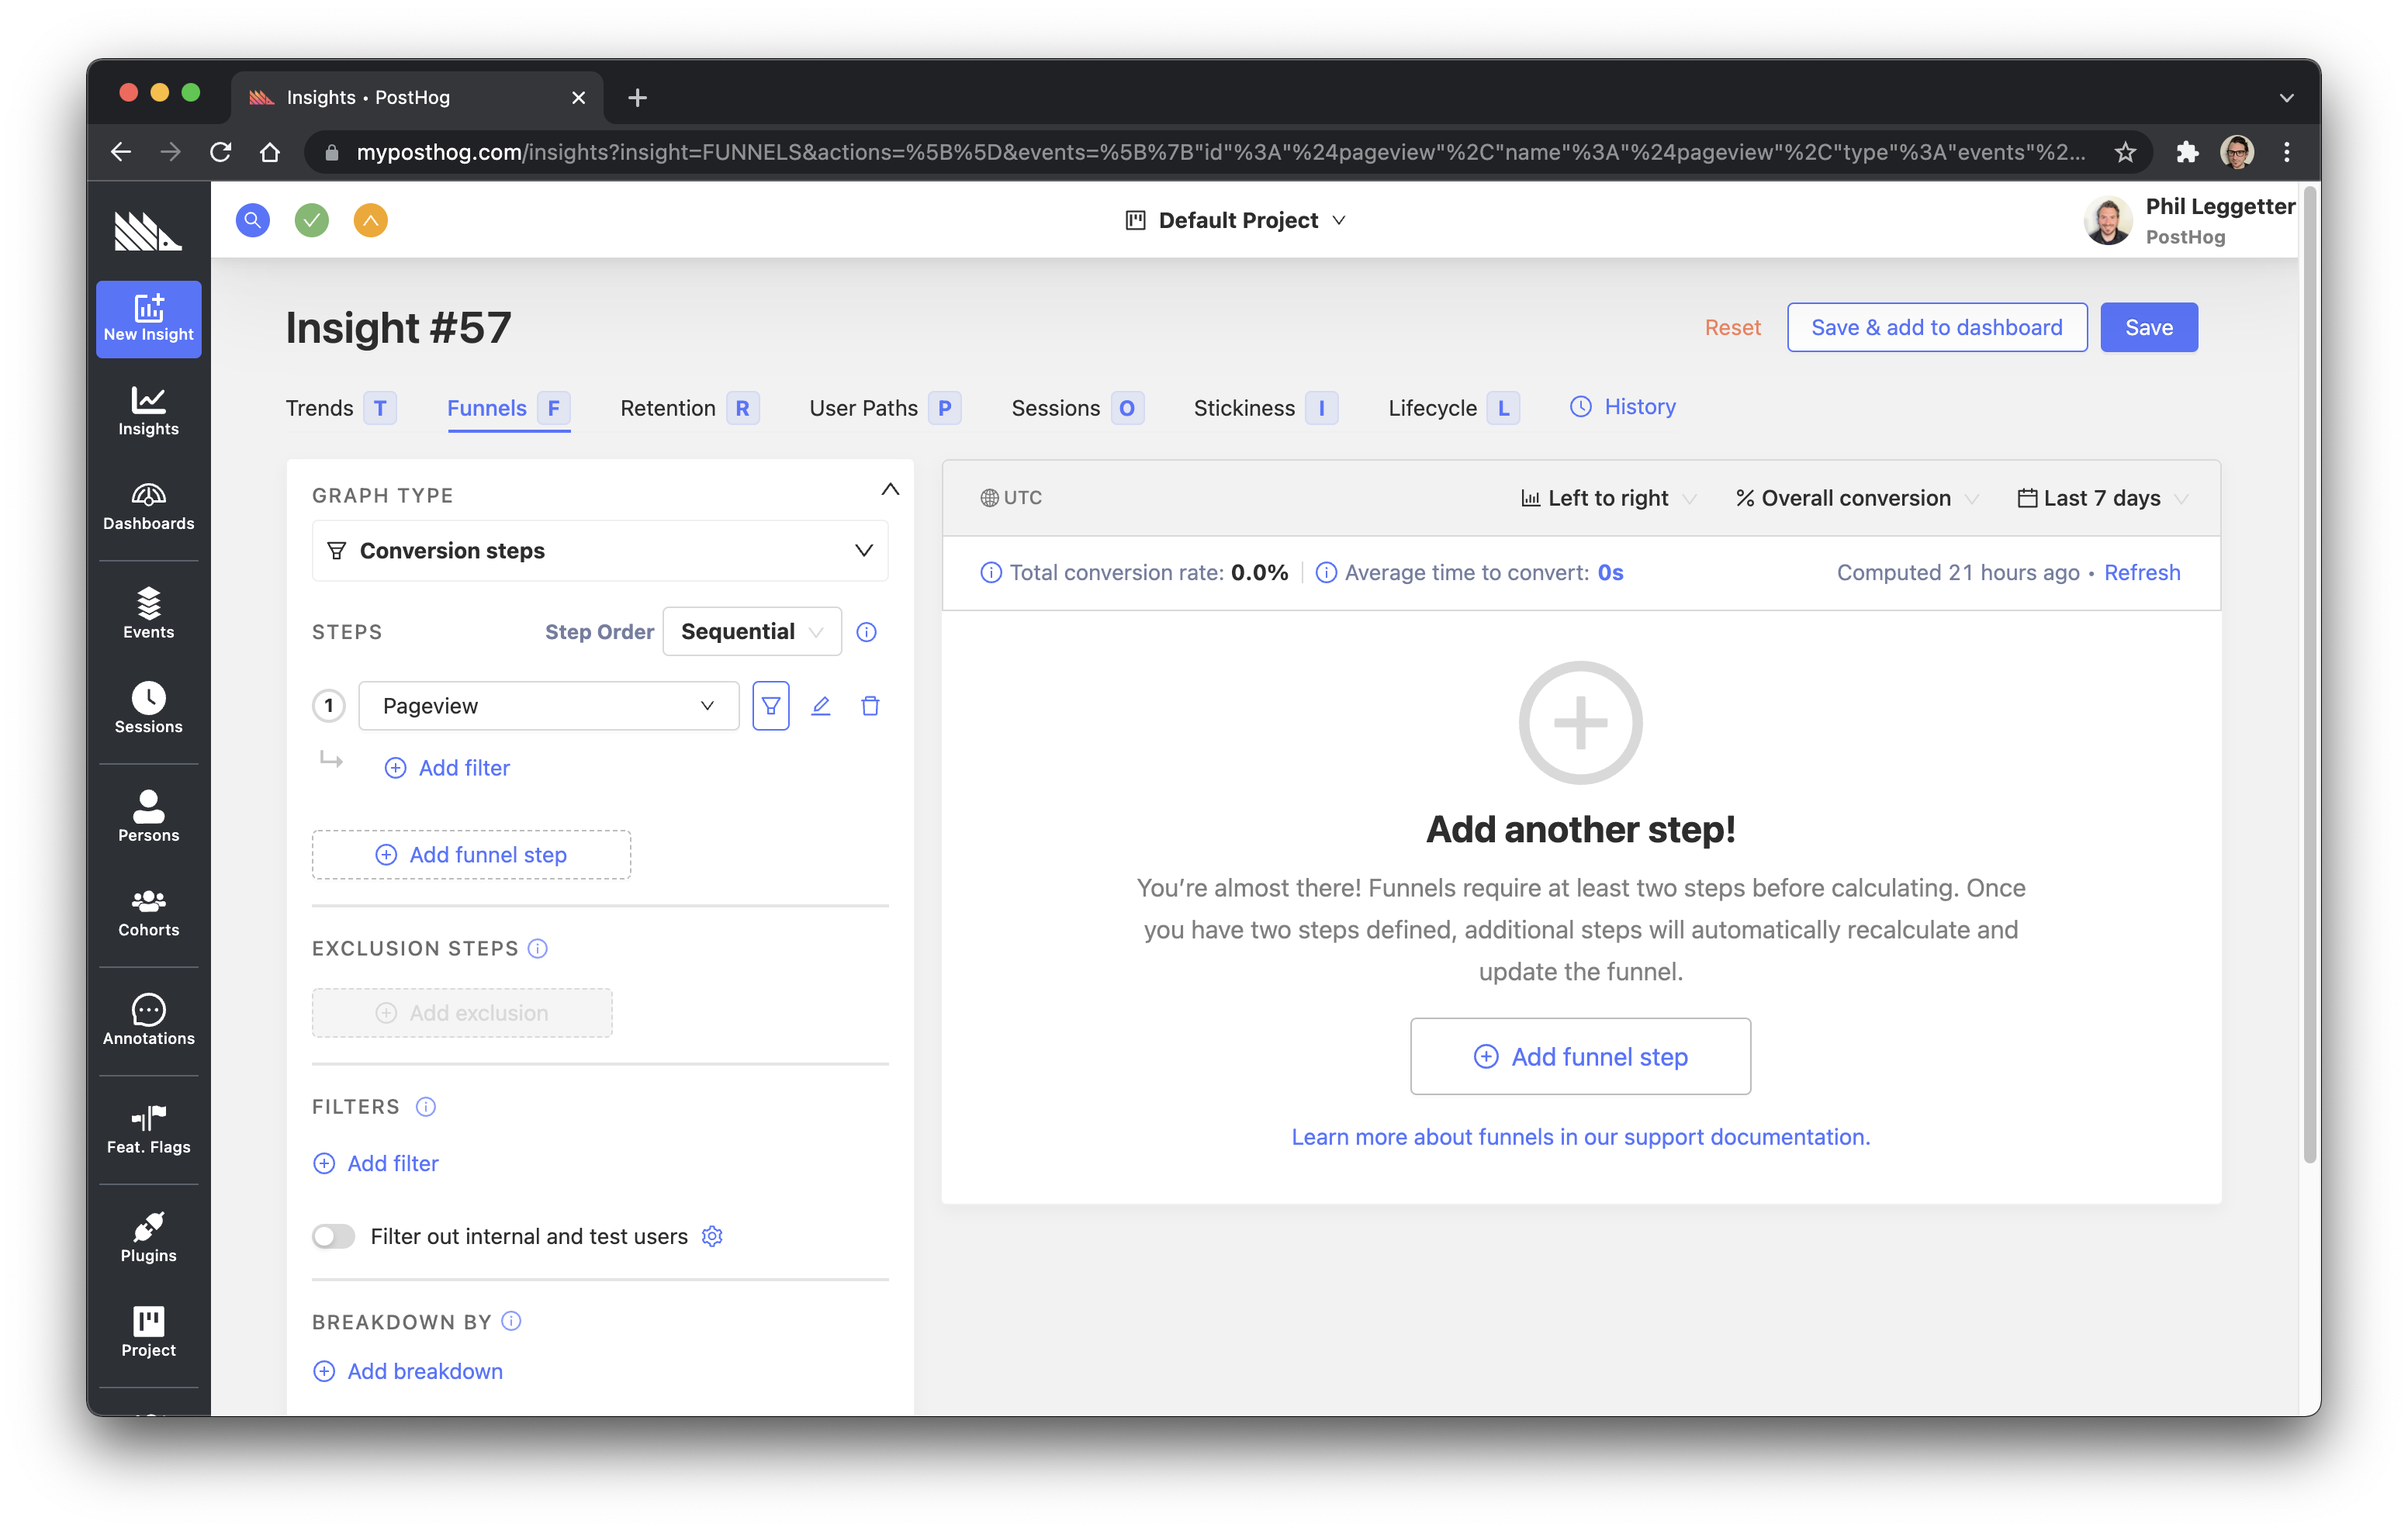
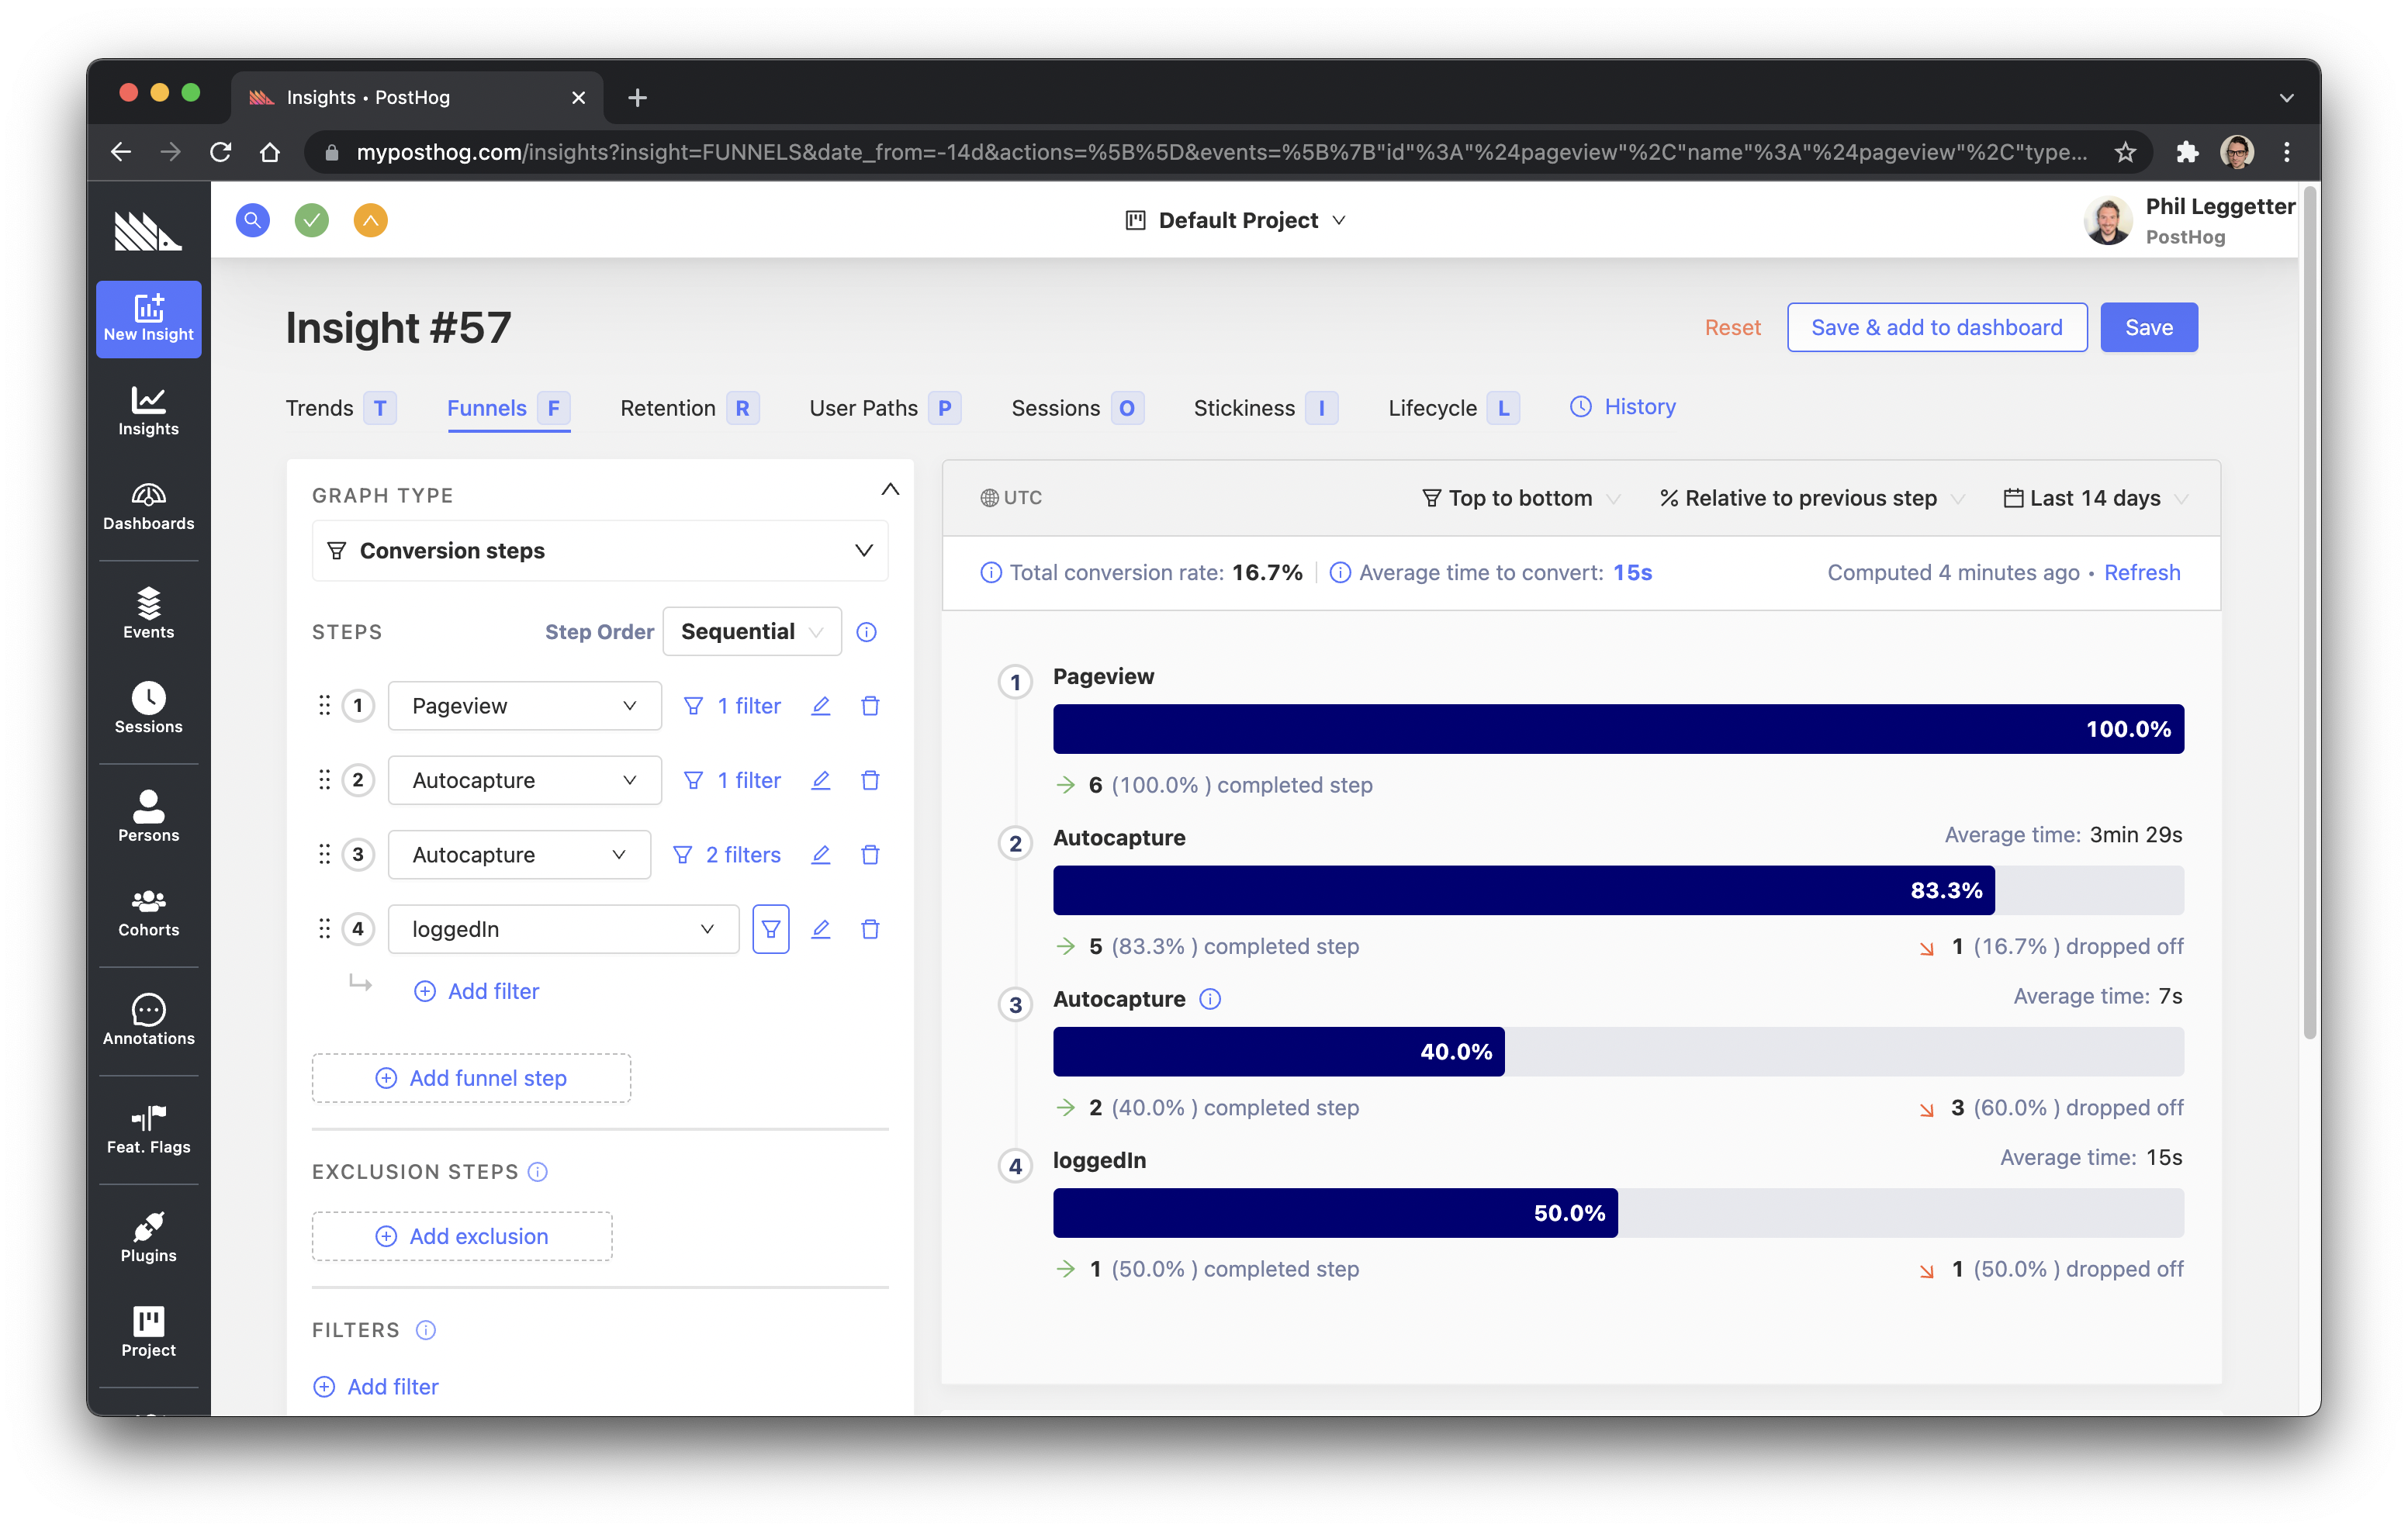
On the left-hand side of the view there is a panel with Graph Type and Steps headings. The Graph Type value is set to Conversion steps, which is what we want. The first of the Steps is set to Pageview. As we flesh out the steps, the funnel visualization will appear on the right.
Step 1 - User lands on landing page
The first step within the funnel is the user landing on the main website landing page with a path of /. So, the event is correctly set to Pageview but we need to filter the event by path. To do this, click the filter icon next to the step and filter on Path Name where the path value is /.
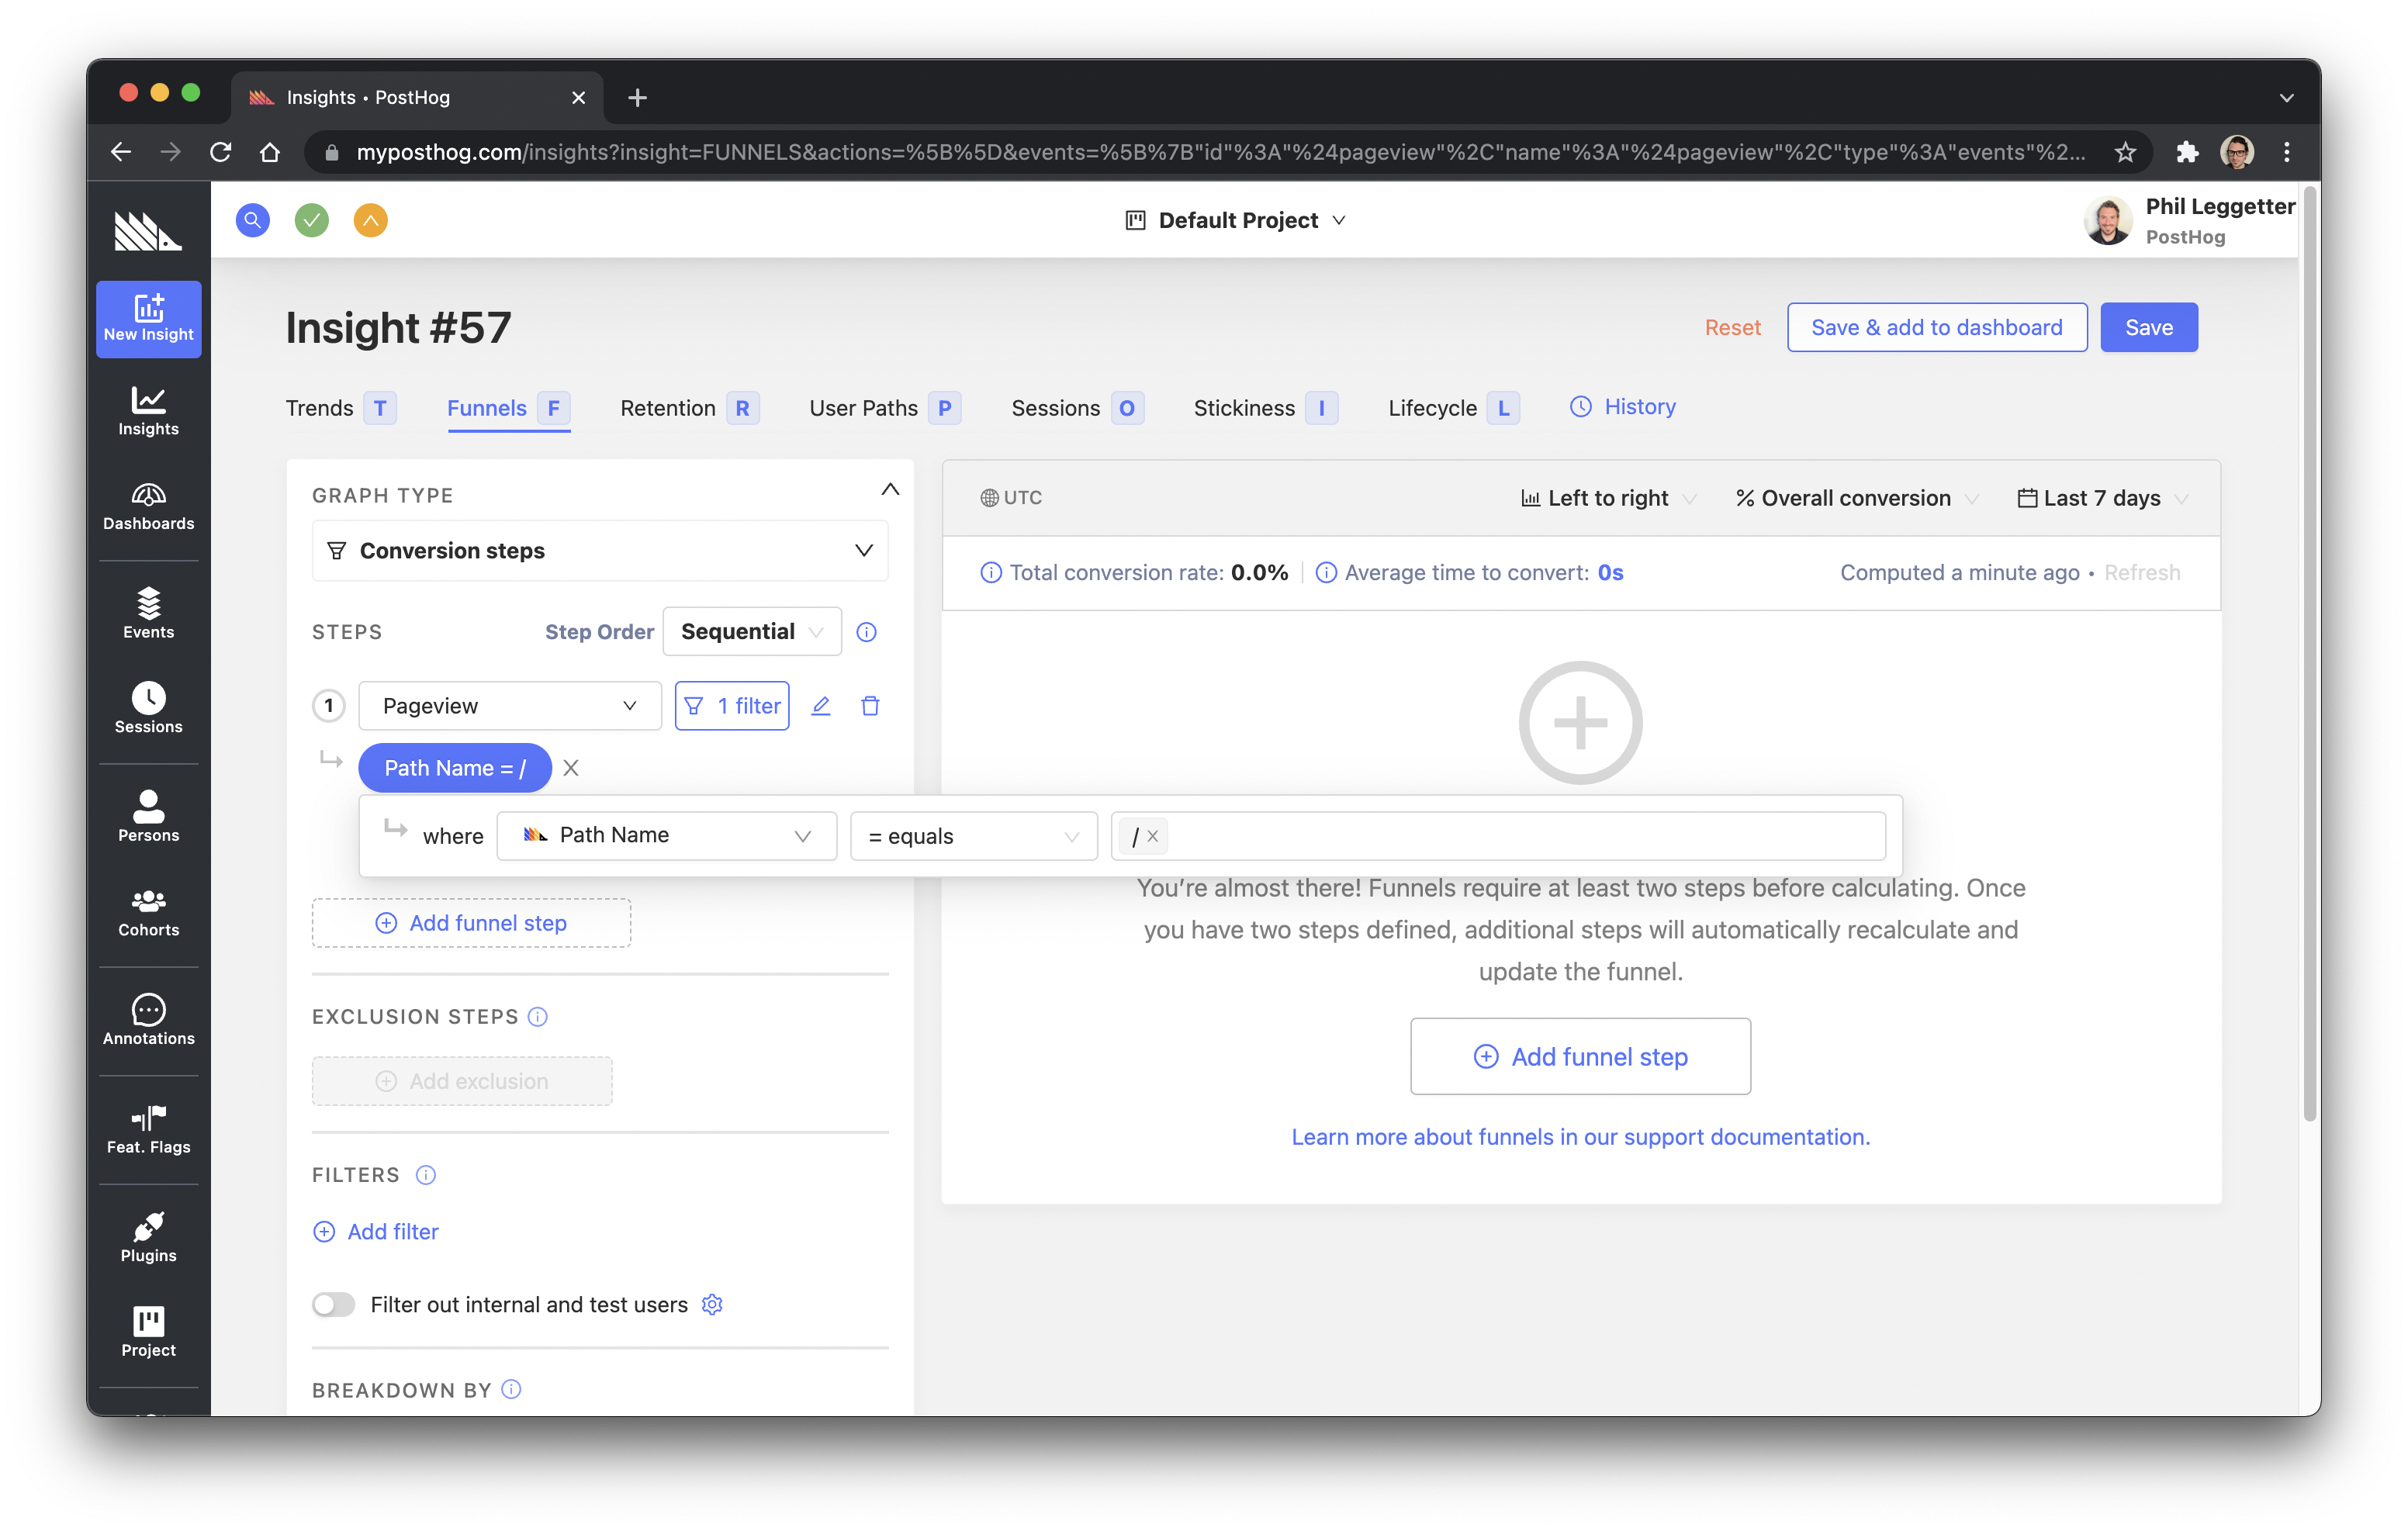
A funnel visualization won't appear at this point because a funnel must have more than one step.
Step 2 - User clicks SignUp button
To add the second step, click either of the Add funnel step buttons. Change the event to Autocapture since the event we're looking to make use of was one autocaptured by the PostHog JS SDK. Then, set a filter. When you click the filter icon this time, select the Elements tab and select the Text property.
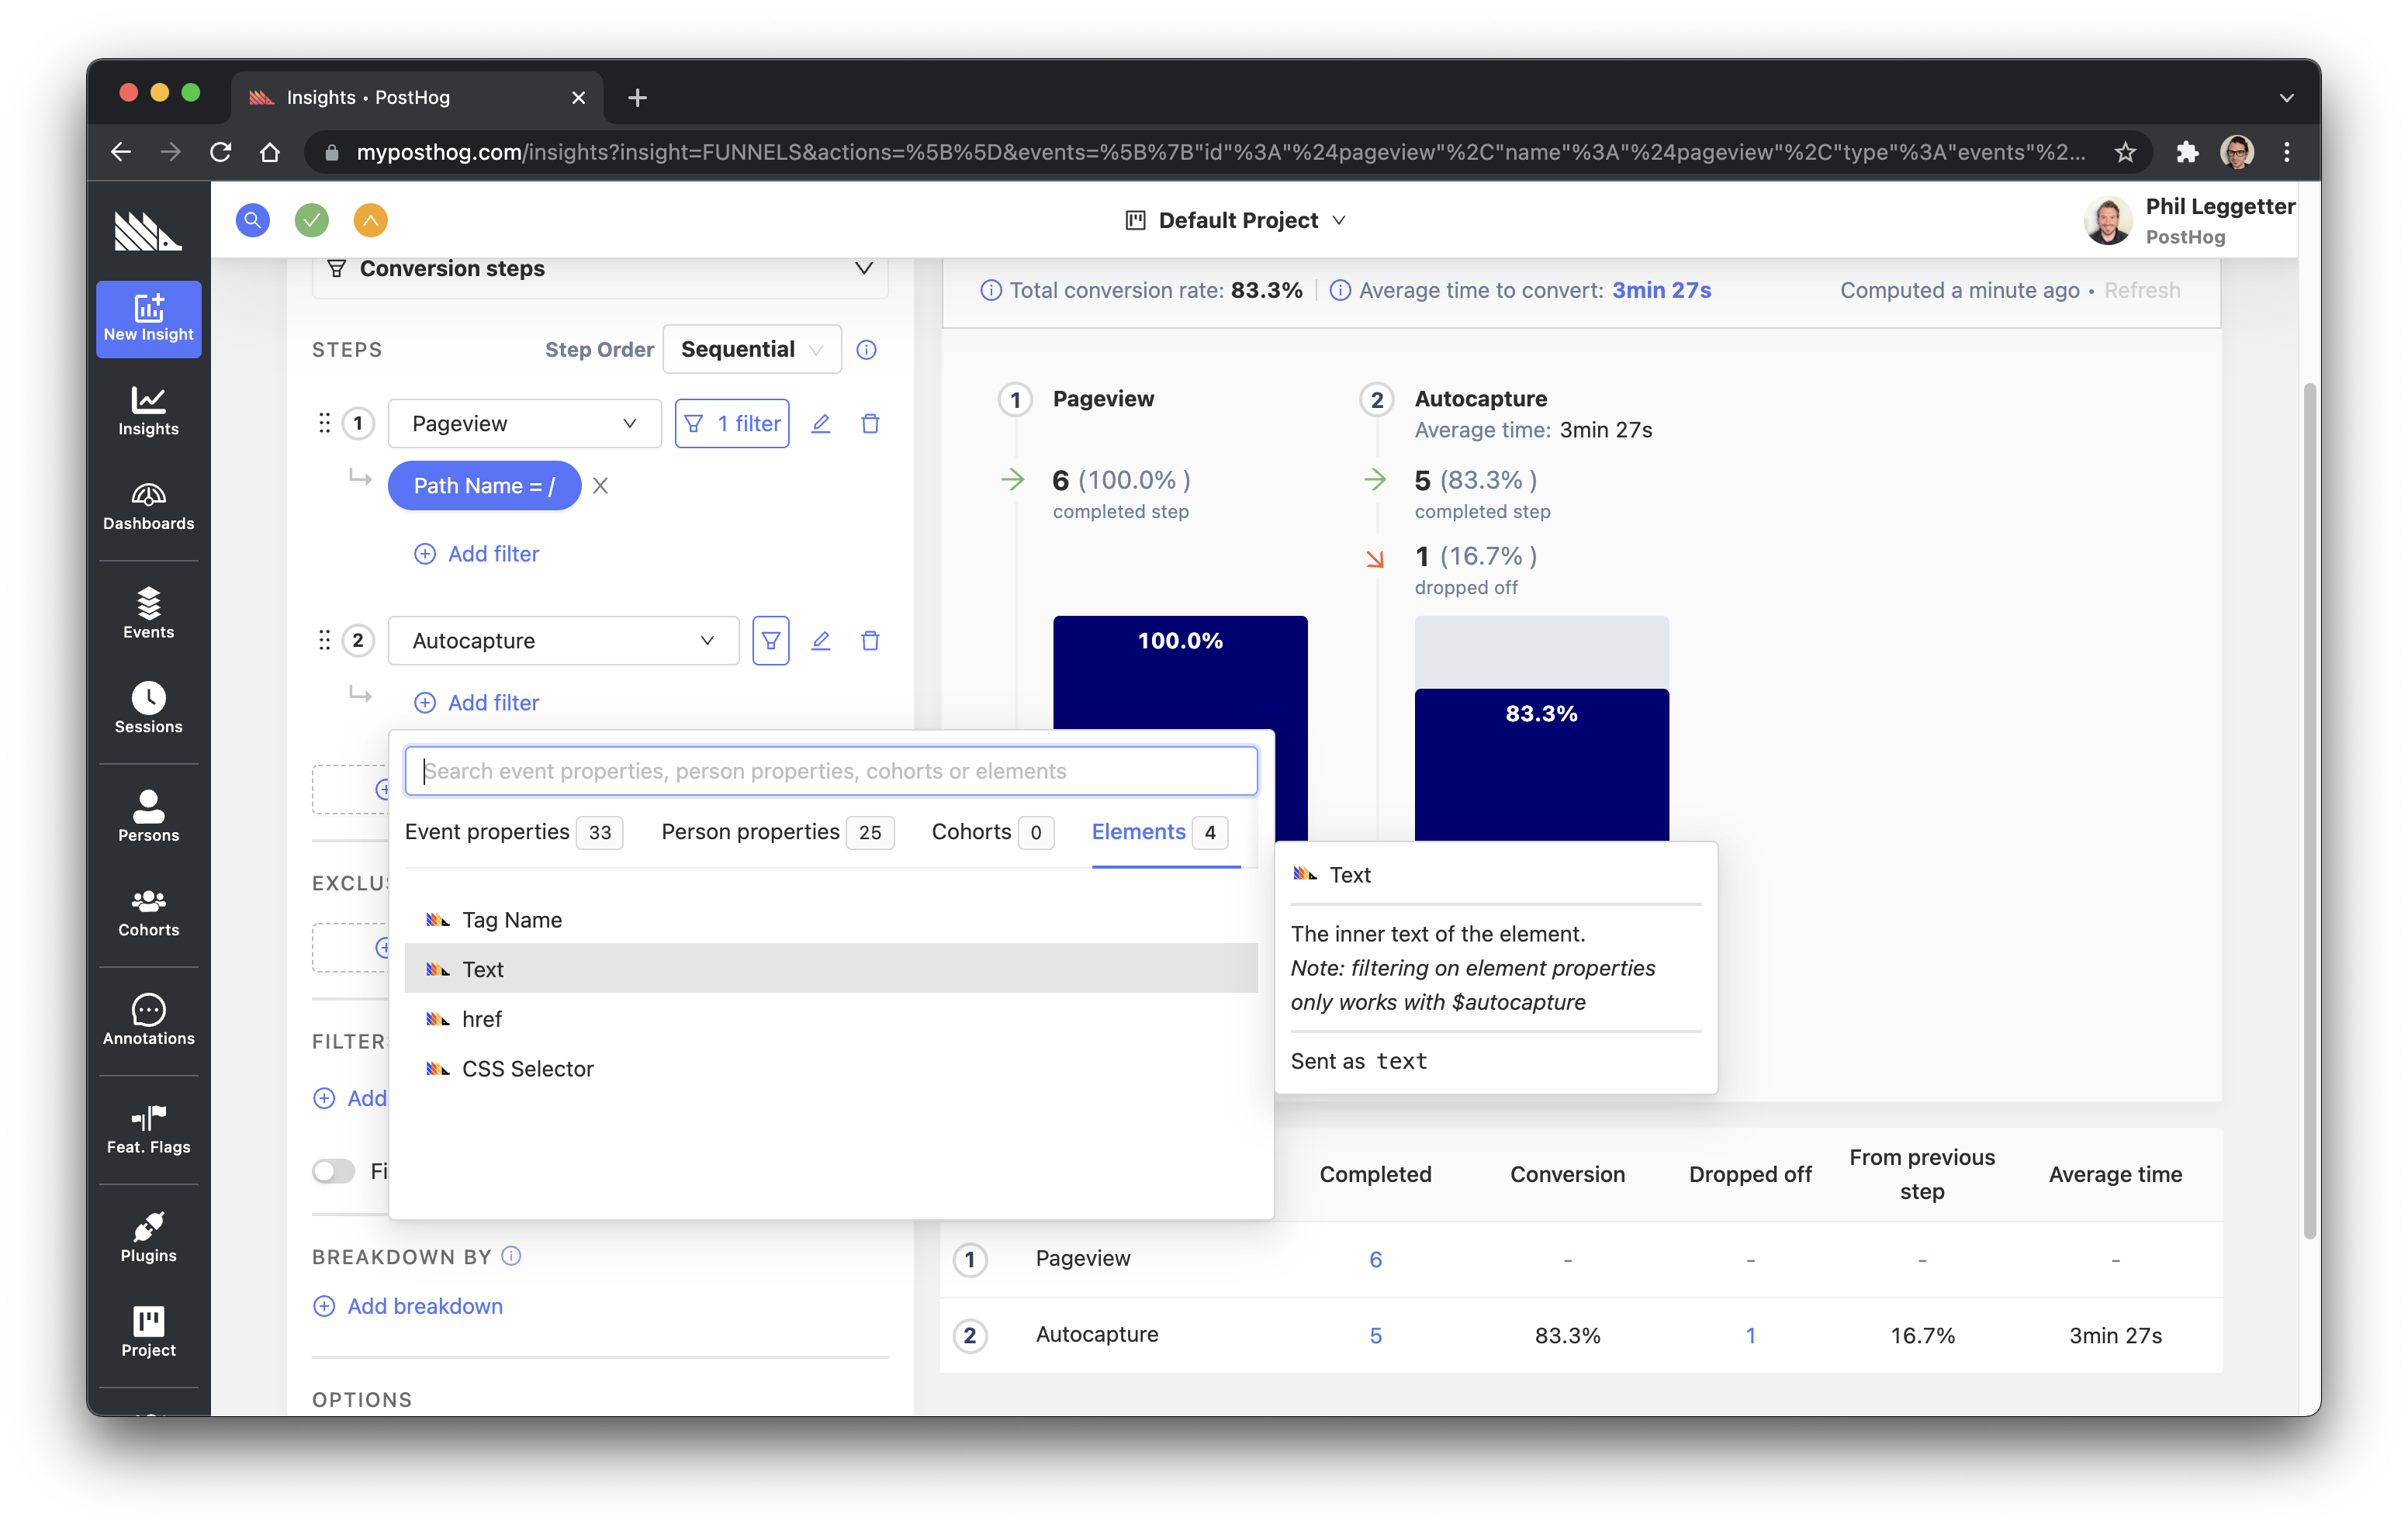
For the filter value choose SignUp, which should be pre-populated based on the values that PostHog has already ingested from our testing.
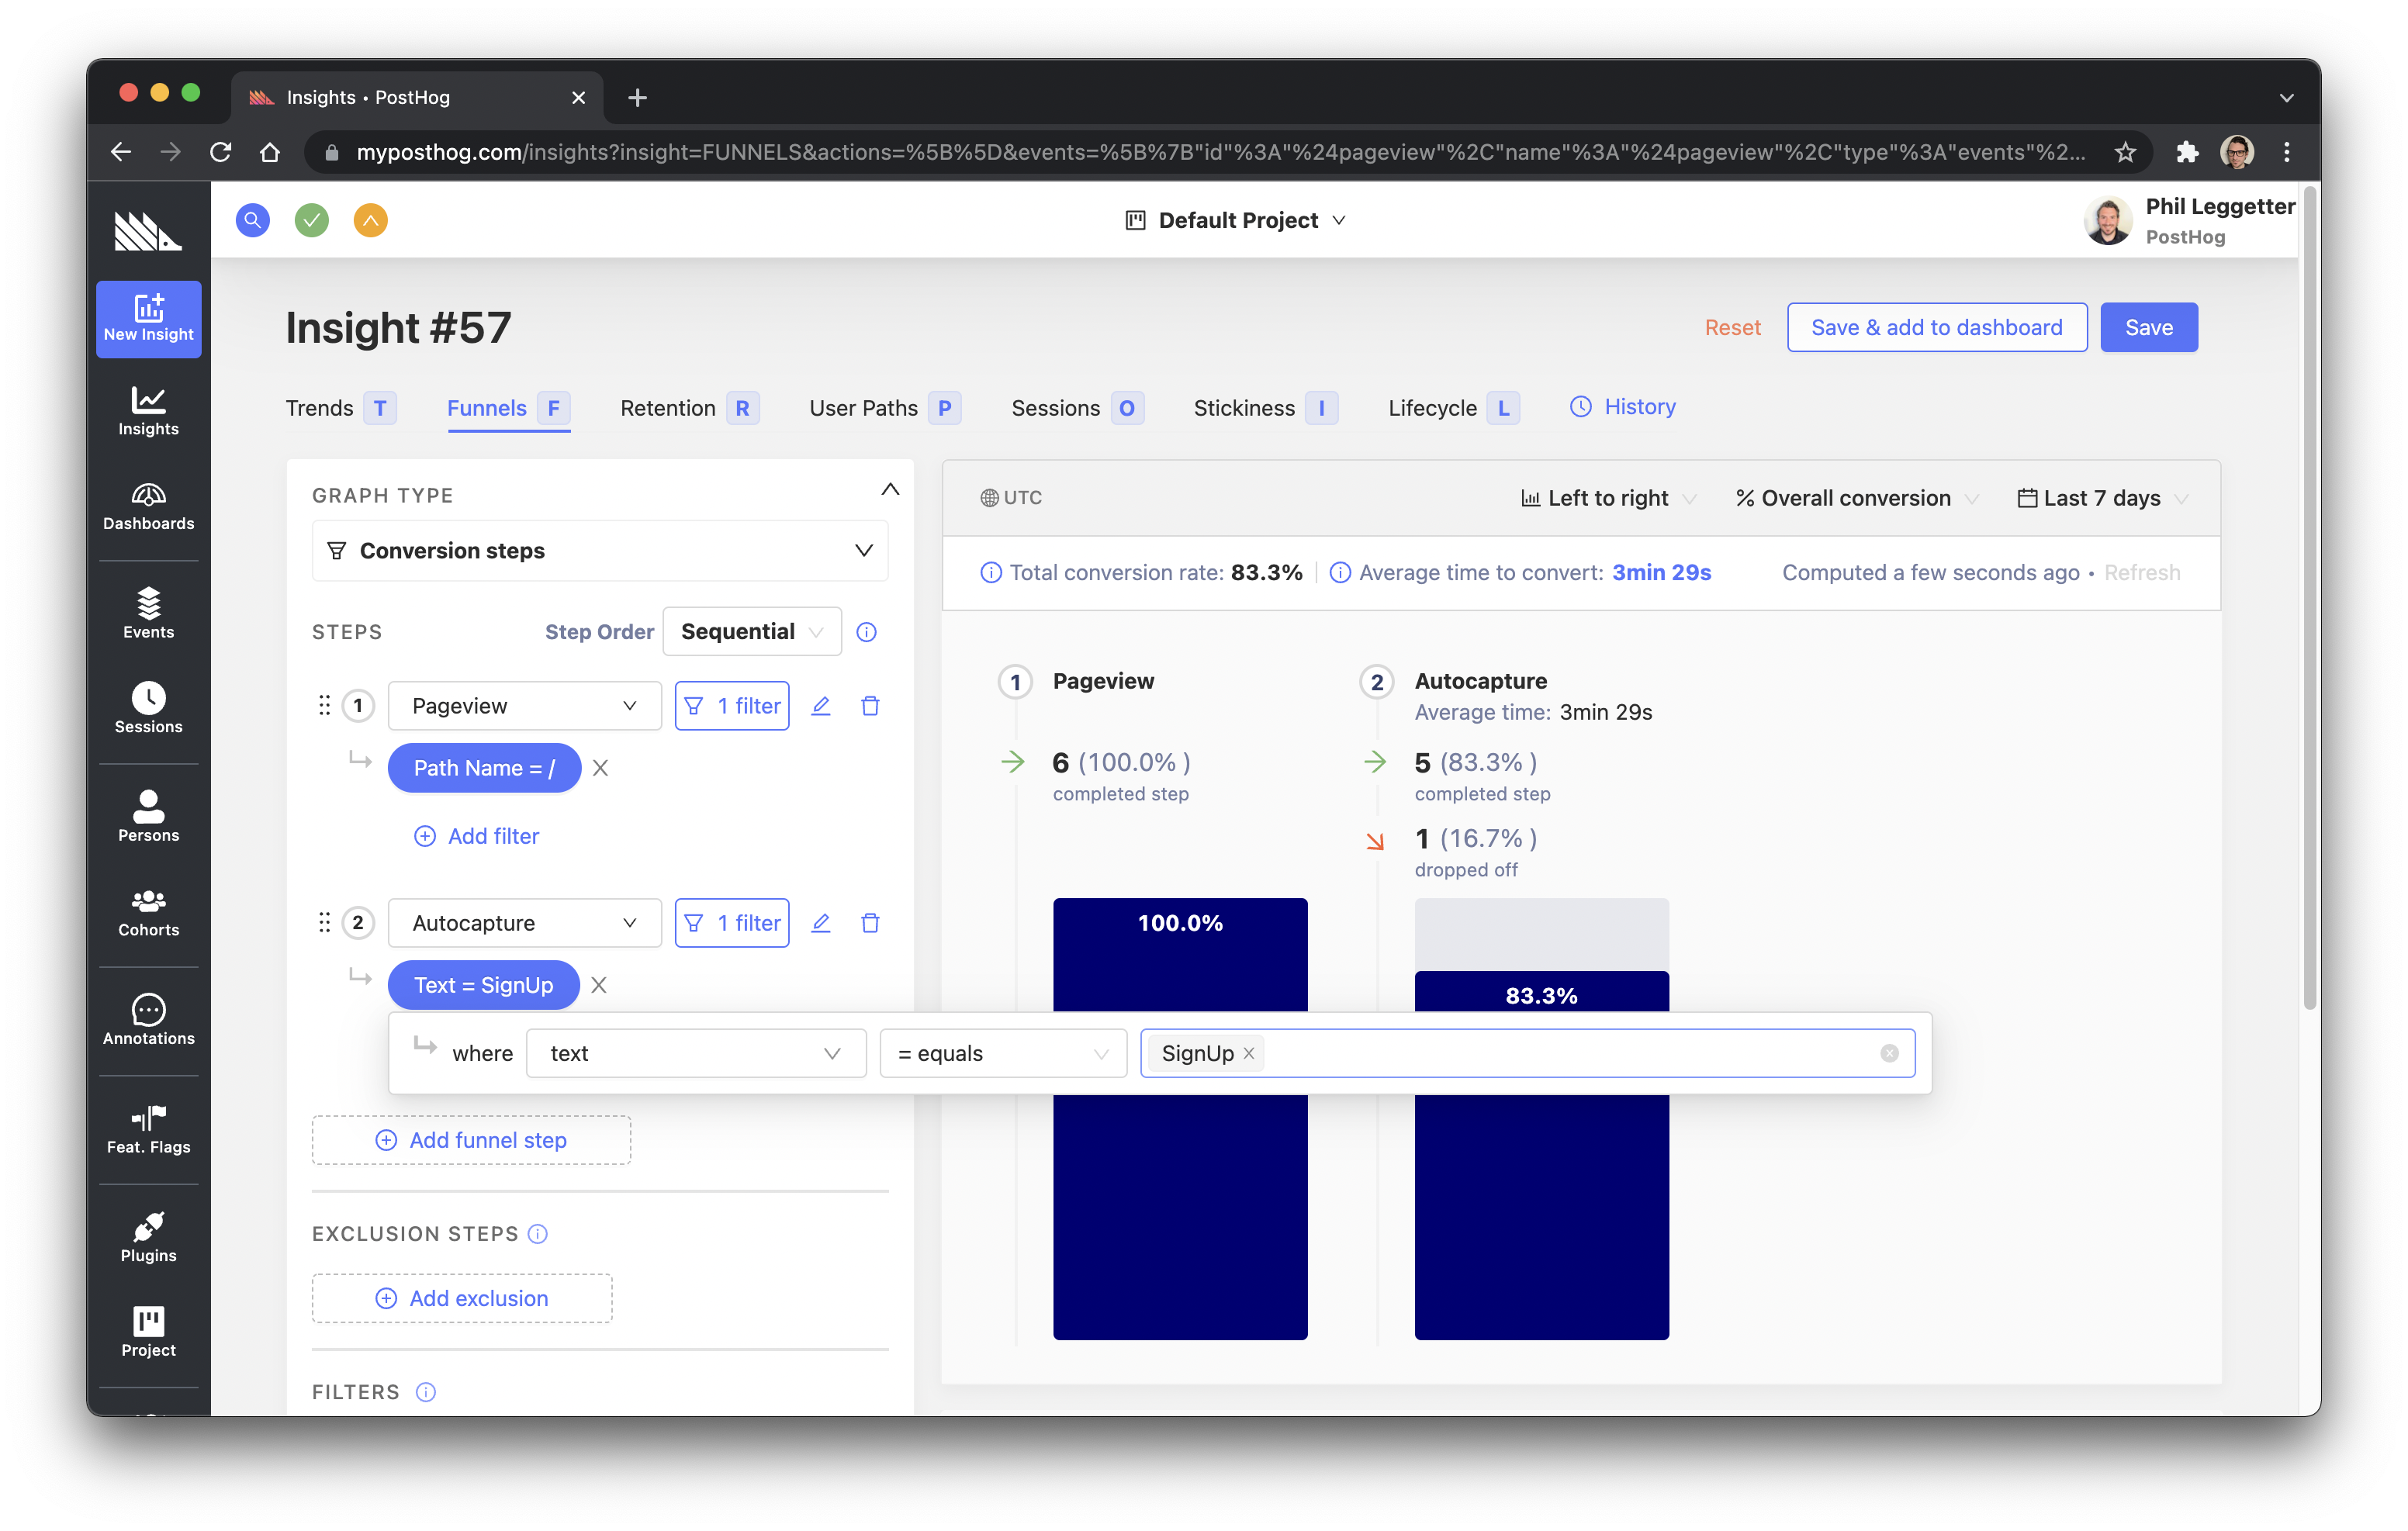
As you populate this step, you'll see the funnel visualization appear.
Note: you could also have done a Pageview again here, filtered by a Path Name value of /auth.
Step 3 - User submits sign up form
For this step we want to track the sign up form submission. So, create a new step with an event of Autocapture and a first filter on the Event Type property (not be confused with the top-level event) with a value of "submit" for the form submission.
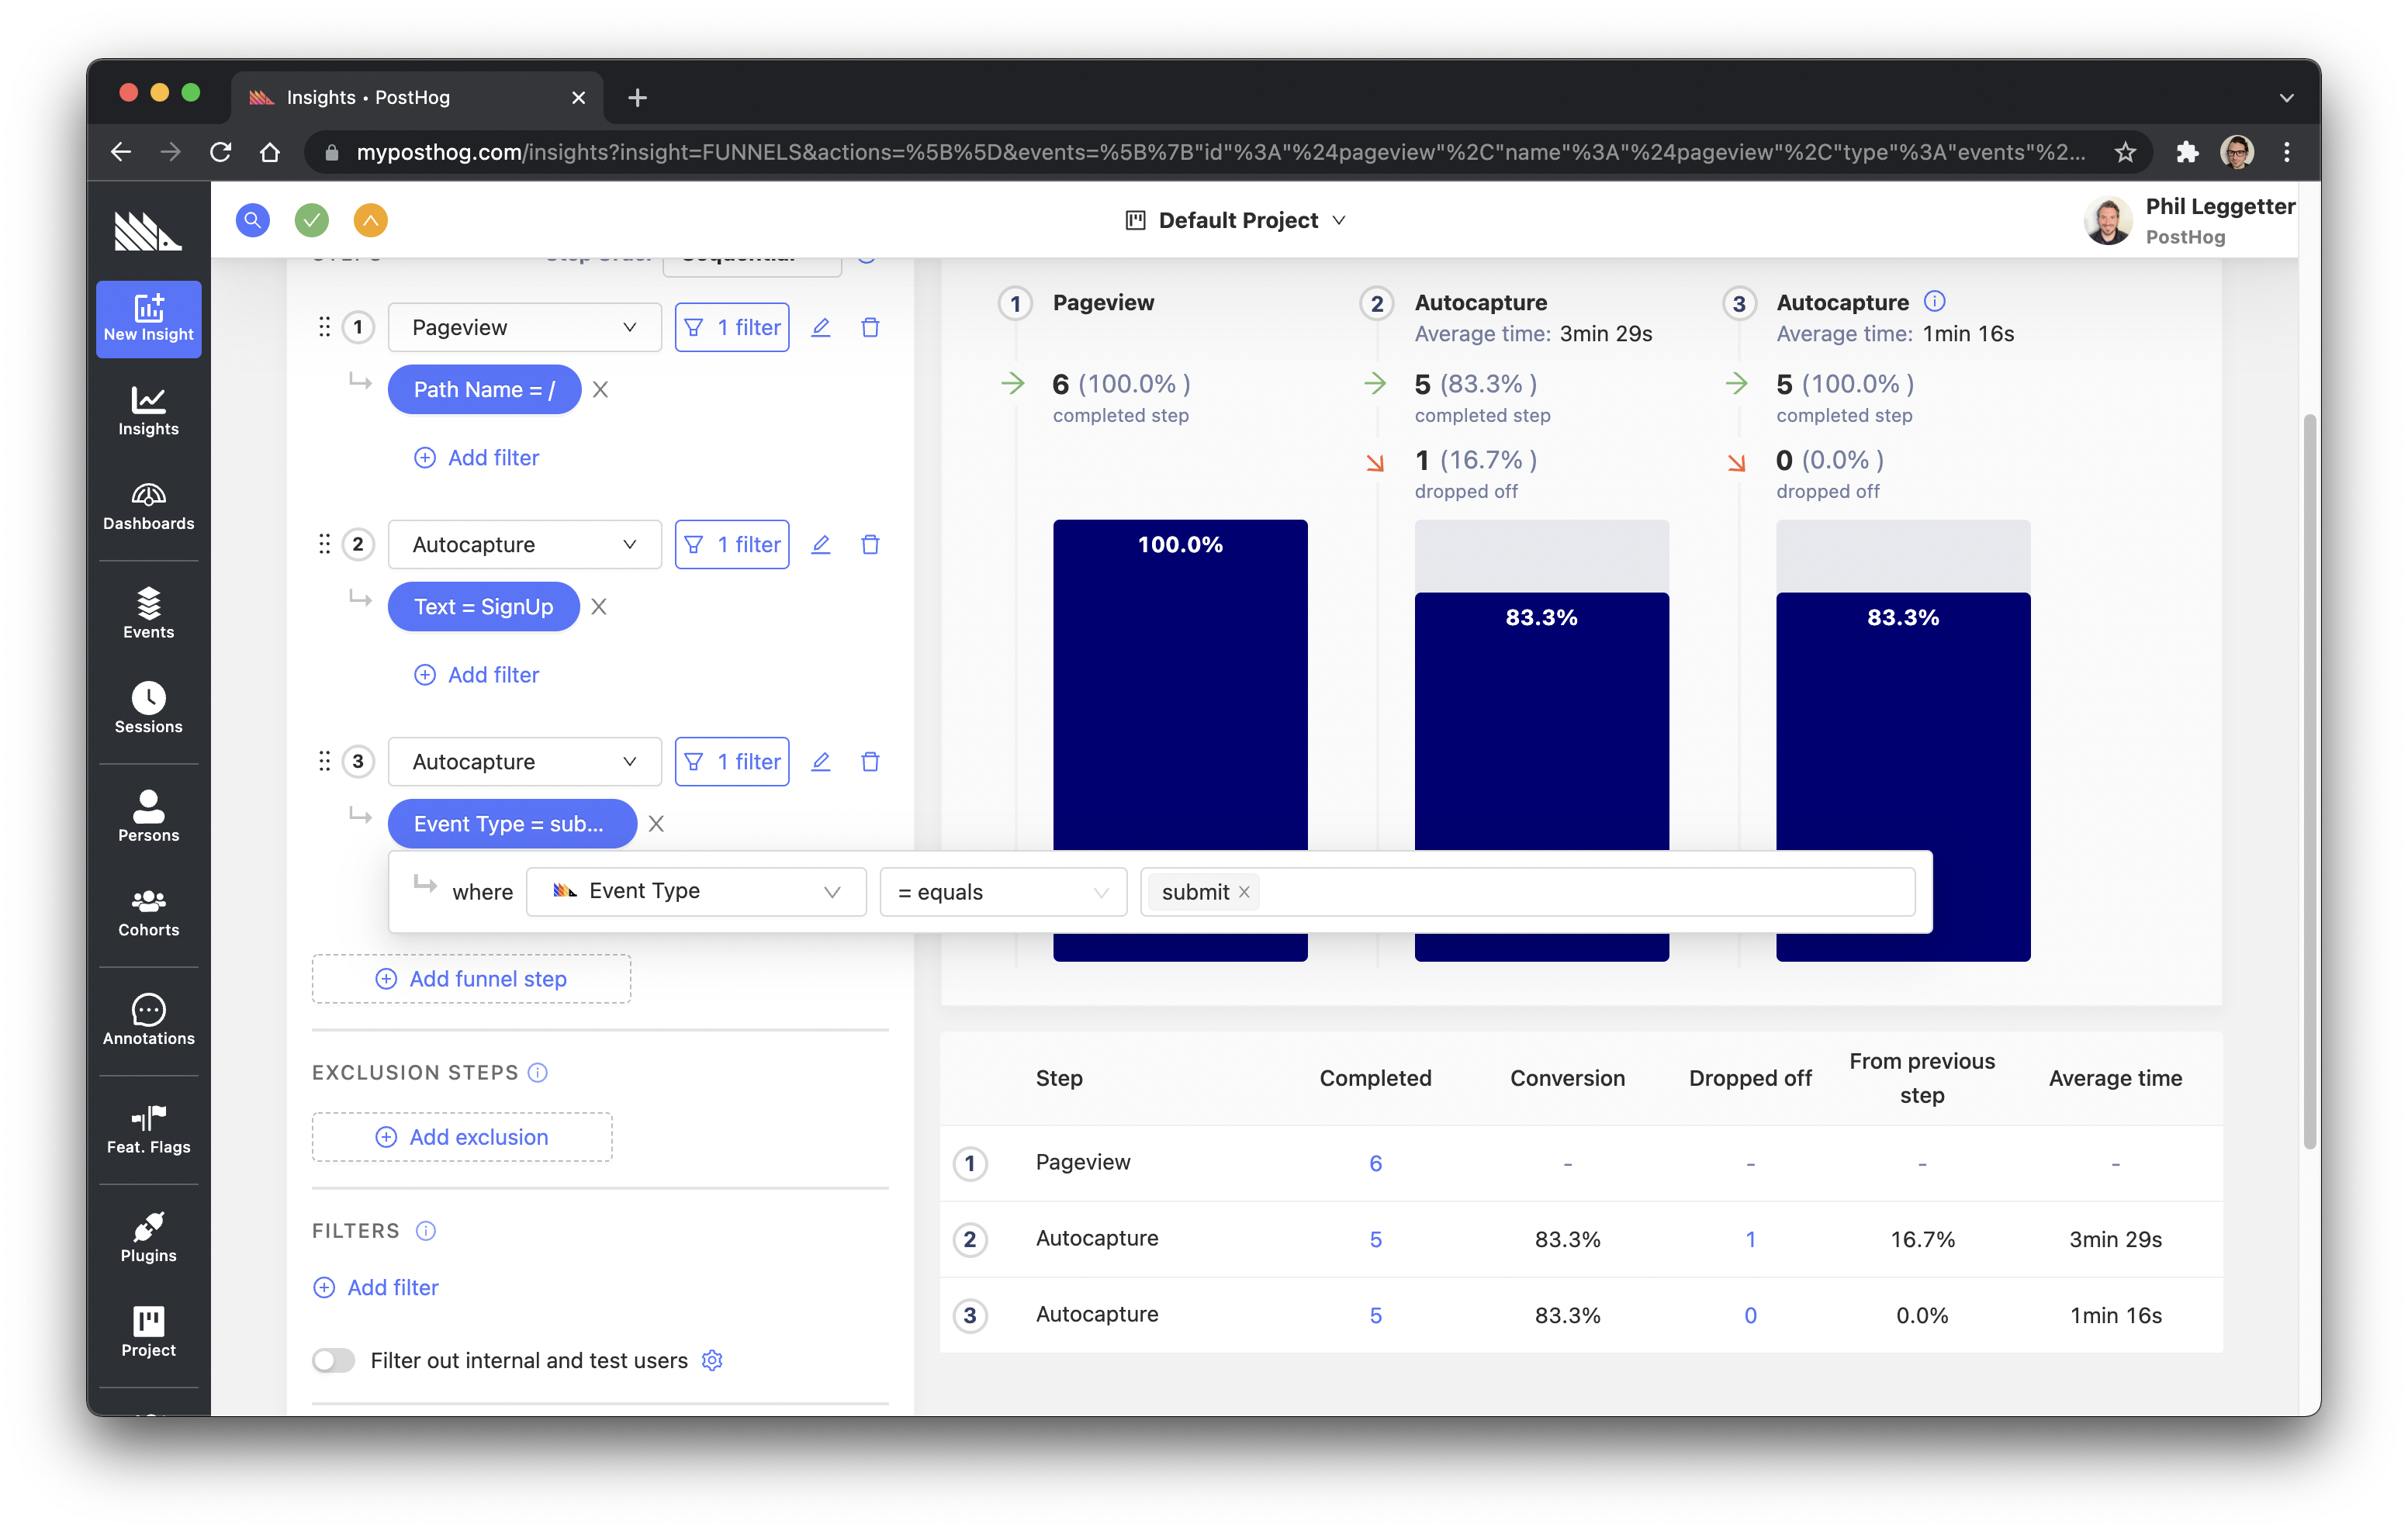
However, the above filter will track all form submissions. This may include forms other than the sign up form. So, add a second filter specifically identifying the sign up form based. To do this, select the Elements tab, choose CSS Selector, and set the selector value as [id="sign_up_form"] to identify the id attribute as having a value of sign_up_form.

Step 4 - User receives registration email
As noted in the table above, we don't presently have a way of tracking this because it happens on systems outside of our control. Remember, though, it may be that an email provider could integrate with PostHog to also track email events.
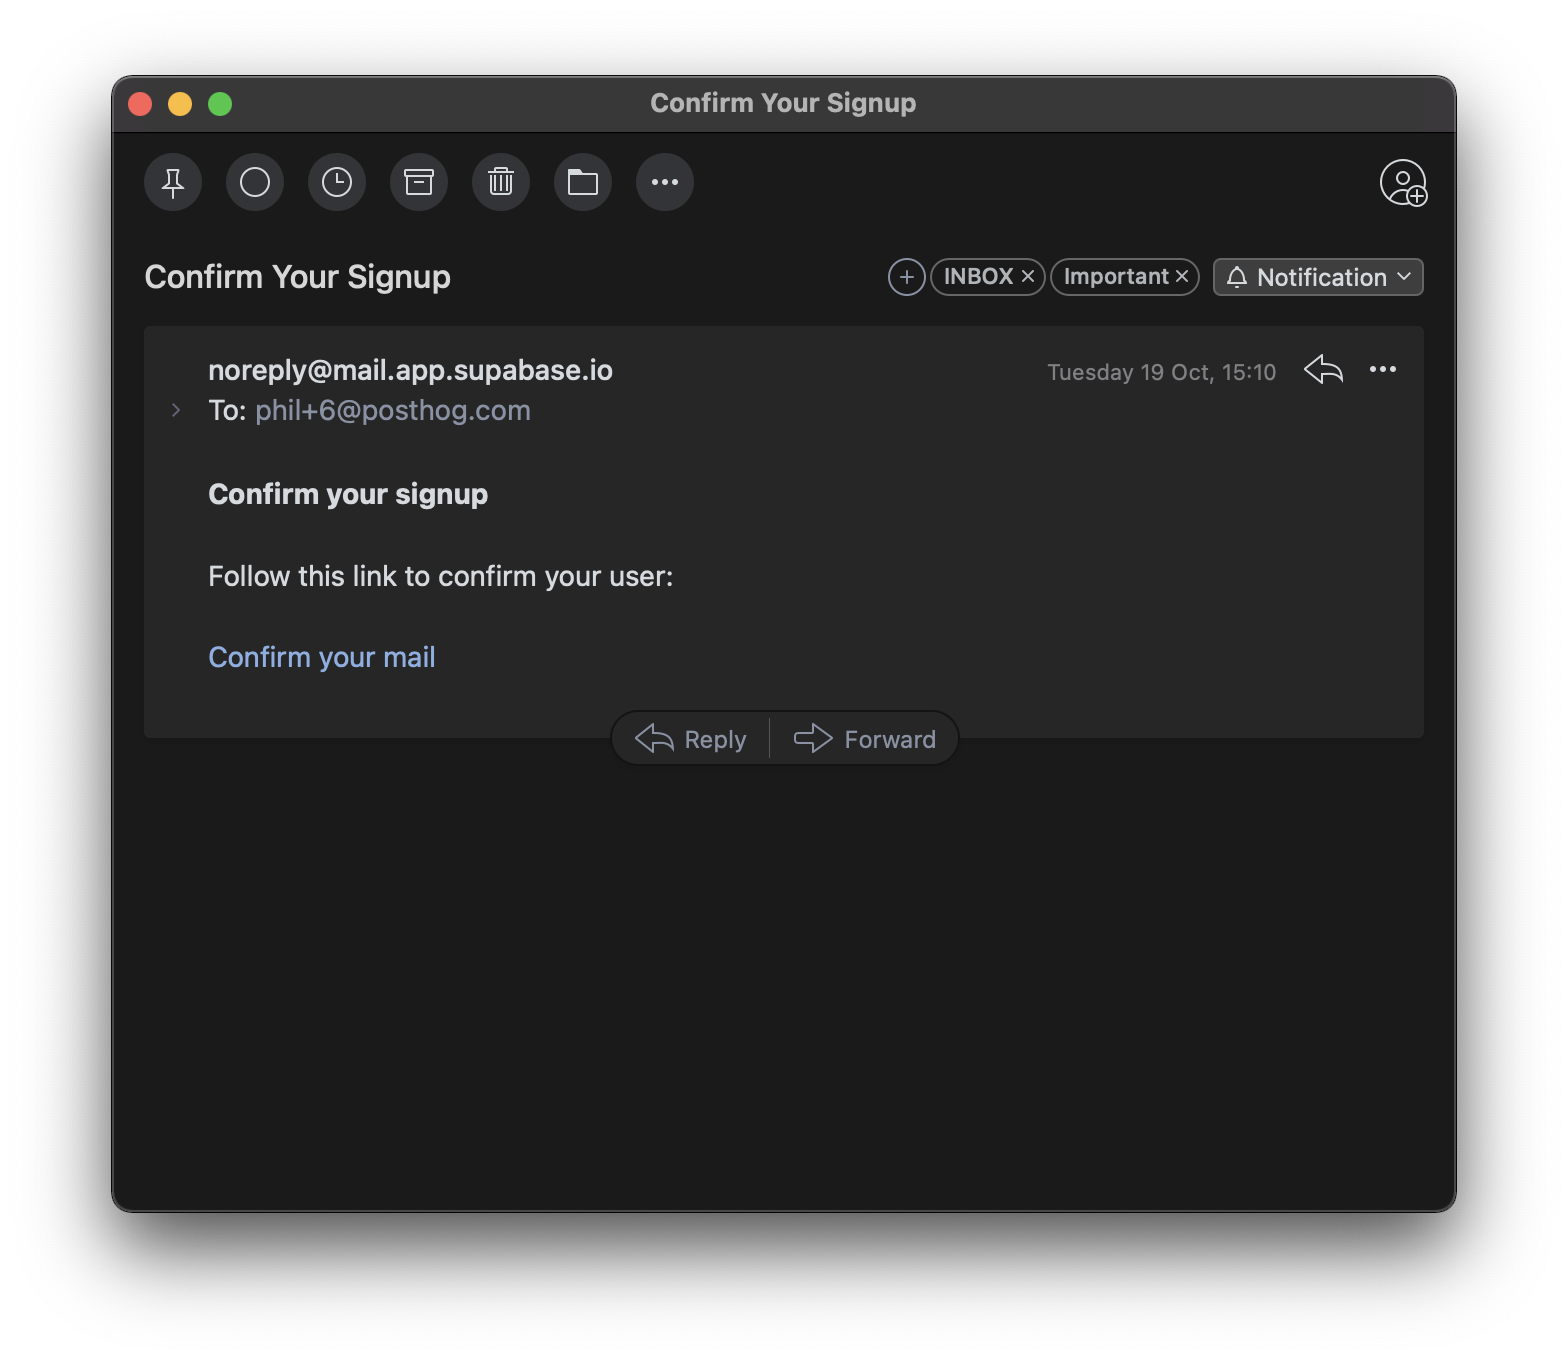
Step 5 - User clicks on link in email and logs into app
This represents successful completion of our sign up funnel. We added some custom code for this step earlier where a loggedIn event was captured. Of course, for a user to have successfully logged in it does also mean that the sign up has been successful.
So, add a new step to the funnel and select the loggedIn.
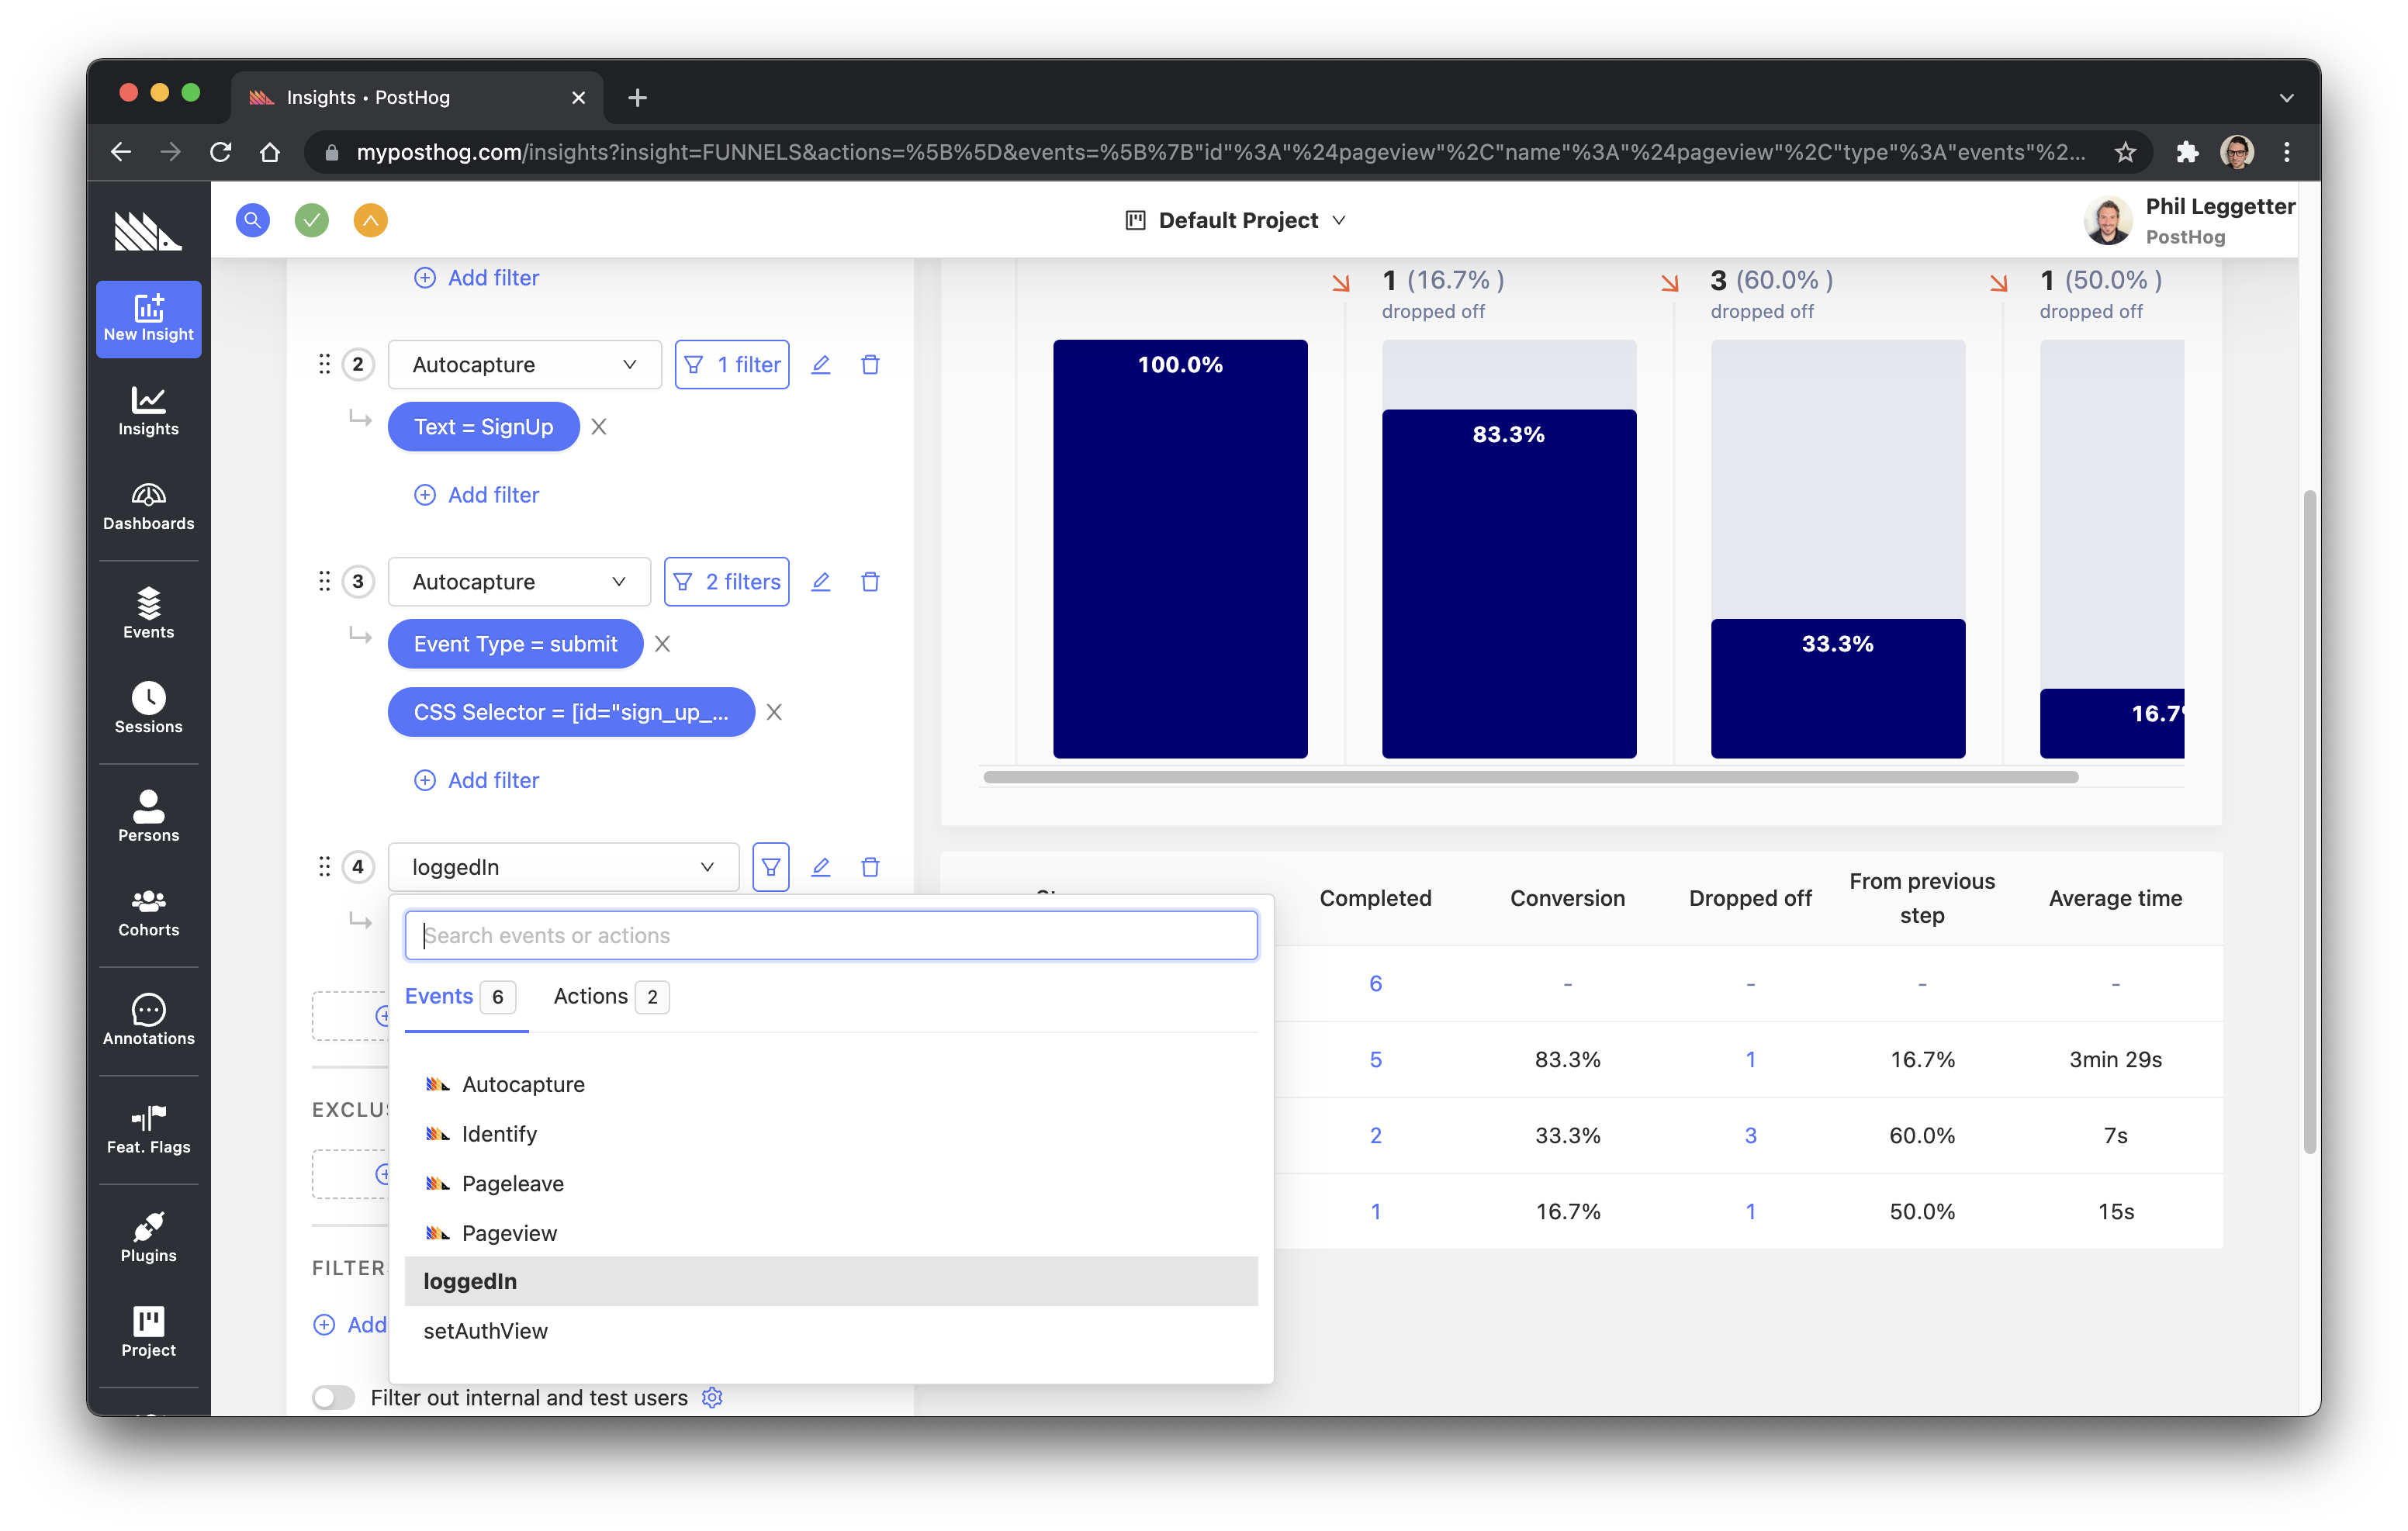
The funnel is now complete and we can see the journey of users through the sign up funnel, users that have dropped off, and users that have completed sign up.
You can adjust the options in the right-hand panel, if required. For example, you can change the orientation of the funnel visualization from left-to-right to top-to-bottom, the computation in the steps from Overall conversion to Relative to previous step, and the period of time the Funnel is calculated over.
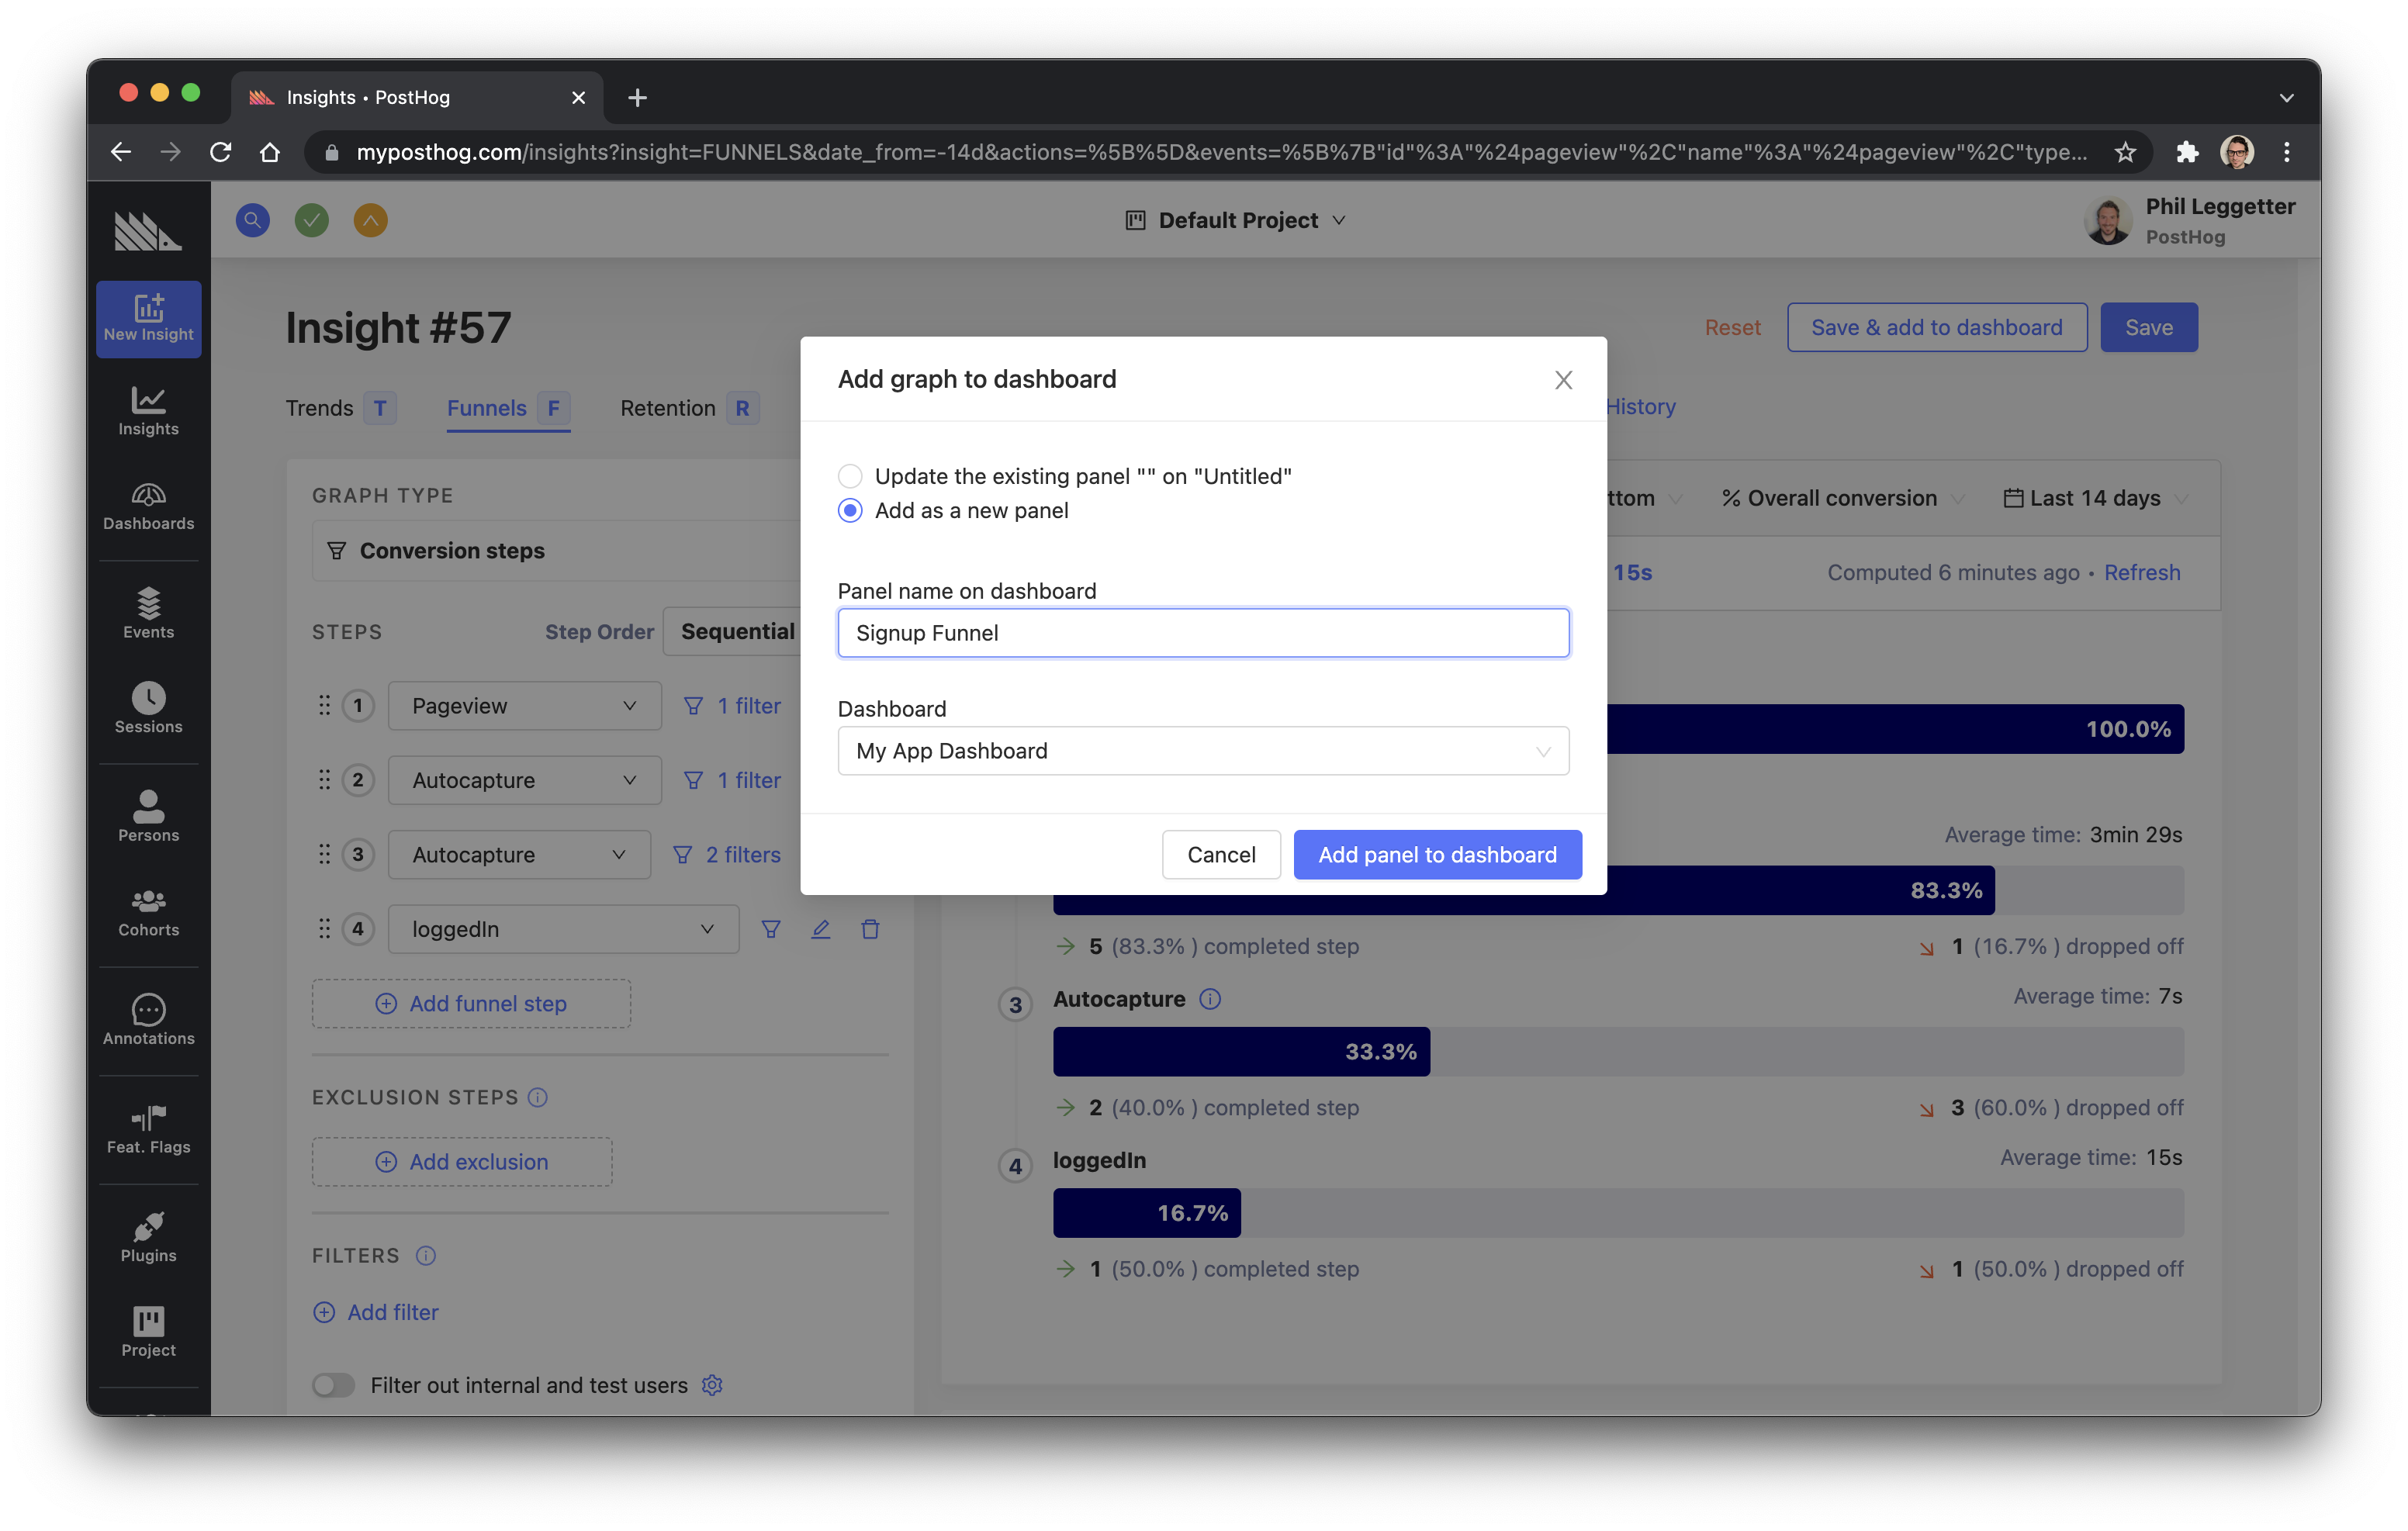
Finally, you can save the Funnel, giving it a name of Signup Funnel, and add it to a Dashboard by clicking Save & add to dashboard.
Conclusion
In this tutorial, you've learned how to create a sign up flow with Next.js and Supabase Auth. You've then ensured all the necessary application events are being ingested into PostHog. This then allows you to define the sign up flow as a sign up Funnel so you can measure the success of the user journey and identify where users drop off.
Where next?
Here are a few examples of where you could explore next.
Use Actions instead of Events
We've made extensive use of Events within this tutorial. However, it can be beneficial to wrap events up into something called Actions. Actions let you group multiple events which can then be used within Insights, such as Funnels.
For example, in this tutorial we used an Event Type and a CSS Selector to track the sign up form submission. If we were to instead create an Action and call it Sign up form submitted this Action could be used within the Sign up Funnel and also easily reused within other Insights. So, why not take a look at creating some reusable Actions, update the existing Funnel to use them, and try creating some other Insights?
Track email sending
We were unable to track the email sending within this tutorial. How about exploring a way to add capture a signUpEmailSent event within PostHog when the verification email is sent?
There are a couple of options here:
- Supabase uses a tool called GoTrue which does support webhook configuration for email events such as
validate,signuporlogin. Why not get involved in the Supabase community and see if these events can be exposed via Supabase? - Turn on Enable Custom SMTP within Supabase and use a third-party email provider that exposes webhooks for email events?

Subscribe to our newsletter
Product for Engineers
Read by 25,000+ founders and builders.
We'll share your email with Substack
Questions? Ask Max AI.
It's easier than reading through 564 docs articles.